The Joomlashack Blog
How to Automatically Add Joomla Links to Keywords
- Written by Steve Burge Steve Burge
- Published: 24 March 2010 24 March 2010
This tutorial is the answer to two questions we've been asked repeatedly:
- How can I automatically link keywords to the appropriate websites?
- How can I use internal links for links on my site?
Essentially they're looking to change a link from https://www.cnn.com to https://www.ostraining.com/link/cnn/. The link still goes to the CNN website, but it first goes to a url on the webmaster's own site.
Why Would People Want to Automatically Link Keywords to Pages?
This is what Wikipedia, the New York Times, Techcrunch and many other websites do in order to keep visitors browsing around their site. It also has substantial SEO benefits. To find out more, see Session 25 of our SEO class: Understanding Internal Linking.
Why Would People Want Internal URLs for Links?
- Statistics. They want to be able to count how many time a link has been clicked on.
- SEO. Some webmasters are worried about leaking their Google Page Rank to other sites. I am not a big believer in this technique, but I know several people who consider this to be important.
- Affiliates. People running affiliate programs want to protect their affiliate links:
- They think internal urls are more likely to be clicked than a url that looks like this: https://www.anrdoezrs.net/click-2660093-10423359
- Some people deliberately avoid clicking on affiliate links
- There are even rumored to be some computer-based viruses that are capable of inserting the spammer's affiliate ID into links to popular affiliate programs when people are browsing.
How to Create Internal URLs for Outbound Links
- Go to Administrator >> Components >> Weblinks
- Click "Categories" and then "New". Create a category for the kind of link you'd like to add. In this case, it will be "Media"
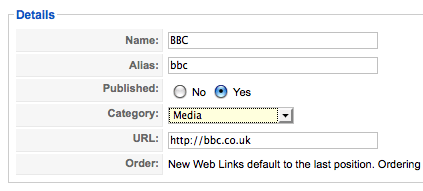
- Click "Links" and then "New". Add entries for the websites you'd like people to visit:
- If you're using Search Engine Friendly URLs, the URLs created will look like this: /weblinks/media/keyword/. If you're not, the URLs will be in this format: /index.php?view=weblink&catid=2:media&id=keyword&option=com_weblinks&Itemid=48
Automatically Add Links to Keywords
We're going to use a small plugin called the "Weblinks Content Plugin":
- Download the plugin from https://joomlacode.org/gf/project/weblinks/
- Go to Extensions >> Plugin Manager and enable the plugin.
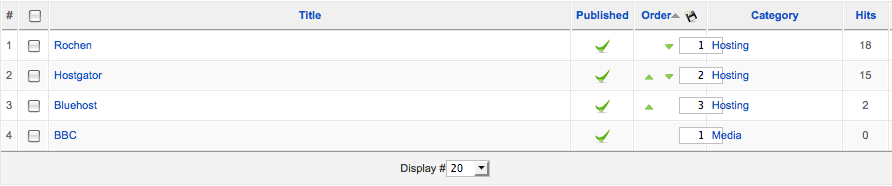
That's it. Now every time you mention an entry in your Weblinks component it will be automatically linked. For example, these are our three recommendations for Joomla hosting companies: Rochen, Bluehost, Hostgator or even the example we gave earlier: BBC.
As people click on these links, you can see how many times they've clicked by going to Components >> Weblinks and looking at the "Hits" column:
Free video lessons from Joomlashack University
- Written by Tom Elliott Tom Elliott
- Published: 18 March 2010 18 March 2010
![]() Joomlashack University is a Joomla video tutorial motherload. And now two of our video lessons are free on our YouTube channel!
Joomlashack University is a Joomla video tutorial motherload. And now two of our video lessons are free on our YouTube channel!
With more than eight hours of professionally produced instructional videos, Joomlashack University provides a wide range of online lessons and courses to teach you Joomla inside out.
To give you a sense of the quality and depth of our more than eight hours of video lessons available in our online training course, we've uploaded two that you can now view for free below.
K2 - the Missing Documentation (Part 2)
- Written by Steve Burge Steve Burge
- Published: 16 March 2010 16 March 2010
The hottest new extension in Joomla is K2.
Why? Normal Joomla articles provide you with a Title and Body. K2 gives you the flexibility to add much more information. Last week in Part 1 we covered the main administrator parts of K2:
- Installing K2
- The K2 dashboard
- K2 categories
- K2 fields and field groups
- K2 items
If you haven't done so already, I highly recommend that you go back and read Part 1 first. This week we're going to focus on the frontend of K2.
K2 Frontend
After Part 1, we should have a several categories, fields and items already inside K2. There are two items that we haven't covered yet, and they really affect the frontend of the site: users and tags.
K2 Users
Each user can have their own profile through K2. That information will appear at the bottom of each article they write, together with details of the other articles they've written. This is Chris, the author of the Canon EOS Rebel article:

- Administrators: People who are Managers, Administrator or Super Administrators can upload their information by going to Components >> K2 >> Users
- Front-end users: When you uploaded the original K2 package, it included a module called "K2 Login". Go to Extensions >> Module Manager and publish that module to allow front-end users to manage their profile.
One downside is that you can't create user fields currently, without writing a custom plugin. There is only:
- Name
- Gender
- Avatar
- Website
- Description
That stands in contrast to a really powerful feature of K2's user system:
K2 User Groups
K2 allows you to have different authors for different categories of your site. If you'd like to have a "Digital Reporter" who submits only review of cameras, you can go to Components >> K2 >> User Groups >> New and create that group from the screen below:

So you could create several different levels of users. To give just three simple examples:
- Contributors: They can add items in particular categories.
- Copy Editors: They can edit and publish items in particular categories.
- Senior Editors: They can add, edit, publish and control items in all categories.
If you use the "K2 Login" module, people can submit articles from the front-end without needing to write from the admin.
K2 Tags
K2 also has the option to add keyword tags to items. These are common in blogs and also is in catalogs so people can easily find related products. On your items, it will look like this:

These tags can be added easily: when you're submitting an item:

K2 Menu Links
Let's start seeing how our items look. Go to Menus >> Main Menu >> New and click K2. You'll see a screen like this:

- Item: Link to just one single K2 item.
- Categories: Link to items form one or more categories at the same time.
- Tag: You can add keywords to the bottom of each item.
- User Page (blog): You can have a list of all the items written by one author
- Latest items: This one explains itself :)
We've been looking at https://demo.getk2.org as an example. If you look there you'll see examples of those different kinds of layouts:

- "Product" = Item
- "Blog Entry" = Item
- "Category Layout"and "Product Categories" = Categories
- "Latest items" = Latest Items
An Overview of K2 - the Missing Documentation (Part 2)
Hopefully we've given you a taster of K2 and how you can use it to create articles with far more information and features.
We've taken you through all the basic aspects of K2. There's enough material for many more tutorials, including how to add video, photos, photo galleries, attachments and much more, but hopefully these two tutorials have been enough for you to catch the K2 bug!
Resetting the Password for Any User in your Joomla site
- Written by Forest Linden Forest Linden
- Published: 15 March 2010 15 March 2010
For one reason or another, you may come upon the situation where you’ve lost your ability to login to Joomla with your super admin login information.
If this happens to you, here’s how you can reset the password:
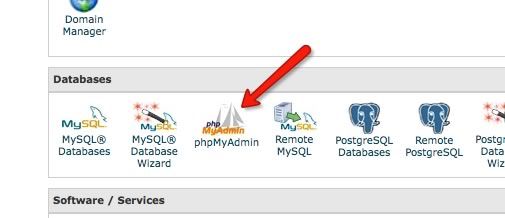
1) Login to the control panel of your web host account and open phpMyAdmin:
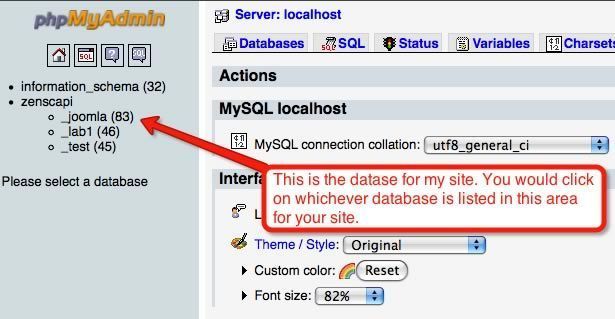
2) Open up the database for your website:
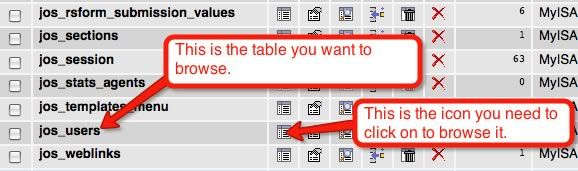
3) Find the table that ends in “_users.” It will most likely start with “jos,” but it could start with some other letters.
When you find it click on the Browse icon just to the right of the table name:
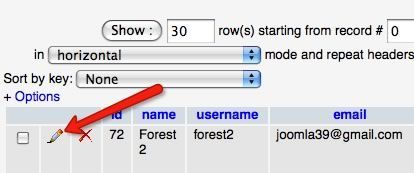
4) Find the user whose password you want to change in the list on the next page and click on the pencil icon:
5) On the next page, in the password row, select MD5 as the password type and then enter in your new desired password in the password field:
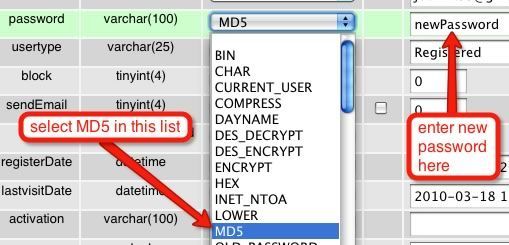
...and then click on Go at the bottom to save this change.
6) Go back to the Joomla administration login page and login with your username and the password that you entered in the last step, and you should be able to login now.
K2 - the Missing Documentation (Part 1)
- Written by Steve Burge Steve Burge
- Published: 11 March 2010 11 March 2010

The hottest new extension in Joomla is K2.
Why? Normal Joomla articles provide you with a Title and Body. K2 gives you the flexibility to add much more information. For example, this is part of a K2 article about a camera called the Canon EOS Rebel:

Beyond just an article, you can add information about:
- Price
- Weight
- Color
- A link for more information
You can also add tags, videos, photo galleries, comments and more.
That is the essential benefit of K2 ... you can create articles with far more information and features.
Installing K2
- Go to https://getk2.org and download the file.

- You'll see a file on your desktop with a name very similar to K2_v2.2.zip
- Go to the administrator area of your Joomla site, then Extensions >> Install / Uninstall.
- Click "Browse" to locate the package file and then click "Upload File and Install".
- Go to Components >> K2
The K2 Dashboard
When you go to Components >> K2 you should see a screen like this one below:

You'll mainly be working from the top menu, so these are the links to concentrate on:
![]()
- Dashboard: Will take you right back to the screen you're looking at.
- Items: That's K2's name for articles. That's where you'll add all your content.
- Categories: Joomla places articles into Sections and Categories. K2 only has categories but you can have as many levels as you like.
- Tags: These are the small keywords you can add at the bottom of each item.
- Comments: K2 has its own comments system. Here you'll find all the comments written on your site.
- Users: A list of all your K2 writers.
- User Groups: Here you can control which categories and which features your writers have access to.
- Extra Fields: Remember the Price, Weight, Color for the camera? Those are fields.
- Extra Field Groups: If you have a lot of fields, you can organize them here.
Understanding K2
When you're getting started with K2, I'm going to recommend that you work in this order:
- Categories
- Extra Fields / Extra Fields Groups
- Items
- Other features ...
This Missing Documentation tutorial will take you through Steps 1, 2 and 3. Next week in Part 2 we'll cover the other features.
Step 1: K2 Categories
The reason we're starting with categories is that otherwise we won't have anywhere to put our items. If you create an item called "Canon EOS Rebel" you need a category called "Cameras" to put it into. There isn't an "Uncategorized" option as with Joomla.
Our aim for this tutorial is to build a site similar to K2's demo. The K2 demo has multiple different categories. We're going to focus on the Catalog. Let's start recreating that set up:
- Click "Categories"
- Click "New" and you'll see a screen like the one below:

- Enter your "Title" for the first category. In this case it will be "Catalog".
- The "Title Alias" is just same as with Joomla. It will be the URL of this page if you have Search Engine Friendly URLs.
- "Parent Category", "Inherit parameter options from category" and the other options can wait until we have more of K2 set up.
- For now just enter a description for your category or click "Image" to upload an image for this category. Both of these are identical to normal Joomla which allows a description and image for each category.
- Click "Save and New" and move on.
- Create more 4 categories called "Digital", "Climbing", "Bikes" and "Snowboard". Make sure to choose "Catalog" from the "Parent Category" dropdown.
- By the time you're finished you should be able to click "Save" and see a category tree like this:

We're going to re-create the K2 demo site so we need to do something else also. The demo site has a blog and a magazine layout. Go ahead and create a category called "Blog" and also one called "Magazine". K2 is big enough to handle products, blogs, magazines and more in just one installation:

Step 2: K2 Groups
Now that we have organization for our articles, we can start to add information to them. A product page is going to need different information than a blog or magazine page. That's where groups come in. We're going to recreate the same fields that we saw with the Canon EOS Rebel.
- Click "Extra Field Groups".
- Click "New".
- Enter "Additional Info" and click "Save.
- Click "Extra Fields"
- Click "New" and you'll see a screen like the one below:

We're going to recreate the fields we saw for the camera:
- Price
- Weight
- Color
- A link for more information
For all of them, we need to select "Additional Info" from the "Create New Group" dropdown.
- For Price, Weight and Color you can choose "Text Field" and click "Save".
- For the "More info" link you can simply choose "Link". You might also want to choose "External link" for "Link Text" and "Lightbox popup" for "Open in".
Hopefully when you're done, you'll see a screen like this:

Next we're going to bring Step #1 and Step #2 together and apply those fields to some of our categories:
- Click "Categories"
- Click "Catalog"
- Under "Associated "Extra Fields Group" choose "Additional Info".
- Open up "Digital". This time we're going to "Inherit parameter options from category" and choose "Catalog". That means that we can automatically update this category when we change "Catalog". We don't have to open it up and make individual changes to each category.
- Repeat the process for "Climbing", "Bikes" and "Snowboard".
Step 3: K2 Items
Now we're all set up. We have categories and information for our items. Let's go and write them:
- Click "Items"
- Click "New" and you'll see this screen:

Now you can really start to see the power of K2! Image, Image galleries, videos, extra fields, attachments and more!
- Enter "Canon EOS Rebel" into the "Title" field.
- Choose "Digital" from the "Category" dropdown.
- From there you're free to add as much information about this product as you want:
- Content: write your article (or copy and paste from the K2 demo)
- Image: upload an image that will go at the top of the page
- Image Gallery: to have an image slideshow you'll need to install and enable the Simple Image Gallery plugin from https://www.joomlaworks.gr, the makers of K2.
- Video: to add videos, install and enable the AllVideos plugin also from from https://www.joomlaworks.gr.
- Extra Fields: you should see Price, Weight and the other fields we added.
- Attachments: you can upload a document for people to download.
- Click "Save" and repeat the process for more items ...
An Overview of K2 - the Missing Documentation (Part 1)
Hopefully we've given you a taster of K2 and how you can use it to create articles with far more information and features.
Looking at the top menu, you can see that we haven't covered Tags, Comments, User, User Groups. We also haven't show you how to control the frontend layout of your K2 site. All of that and more is in Part 2 of our K2 documentation!
![]()
How to Use Sessions in Joomla!
- Written by Steve Burge Steve Burge
- Published: 08 March 2010 08 March 2010
Session storage is a very important aspect of web applications. In its simplest form, a PHP session allows data to be stored temporarily on the server and accessed throughout a user's time on the site. When that user leaves the site or is inactive for a certain amount of time, the data is destroyed. While anonymous sessions are common, sessions are usually associated with user logins. When a correct username/password combination is entered, a session is created around that user's access information and then read and checked every time that user loads a page. As a developer, you can access this session functionality to enhance your extensions.
One practical illustration is the ever-present shopping cart. When you are using an online store, you will usually choose to add a few items to your cart while you are browsing. You may add items at different times, update quantities, or remove products. Instead of using database tables to temporarily store and access this data, using session data is faster and easier.
Joomla's JSession class has already taken care of the nitty gritty aspects of session storage. It provides a very simple interface to store and retrieve data from the user's session.
## Grab session ##
$session = JFactory::getSession();
$session->set('mymessage', 'here is some message text');
....
$mymessage = $session->get('mymessage');
echo $mymessage;

## You can also store arrays and objects ##
$cart = array();
$cart['items'][] = array('item_number' => 12345, 'name' => 'Joomla! Web Security');
$cart['items'][] = array('item_number' => 98765, 'name' => 'Beginning Joomla! Web Site Development');
$cart['shippingInfo'] = array('address' => '123 Main Street', zip => '83957');
$session->set('cart', $cart);
....
$cart = $session->get('cart');
## Make changes or add items to cart ##
$cart['items'][] = array('item_number' => 10294, 'name' => 'Learning Joomla! 1.5 Extension Development');
## Store it back to session; Now it contains updated information appended to original ##
$session->set('cart', $cart);

## Erase cart session data
$session->clear('cart');
There are a few notes that should be made in addition to the above code. You can specify a default value in the get() method much like in the JRequest library. Also, when multiple extensions run on a site, there is a possibility that you can run into naming conflicts in your session variables. For this reason, JSession allows you to create your own namespace.
## Namespace will be called 'uniqueName'
$session = JFactory::getSession();
$session->set('cart', $cart, 'uniqueName');
....
## If session cart is empty or not set, an empty array will be returned ##
$cart = $session->get('cart', array(), 'uniqueName');
$session->clear('cart', 'uniqueName');
Sessions provide a very convenient way to make data persistent without the need to constantly pass it through URL's or hidden form fields. They are very useful in instances where frequently accessed information can be loaded once to save resources on database queries. Check out the rest of the information at the JSession docs page to find out what else you can do with Joomla! sessions.
Verdant: Colorful, powerful, flexible Joomla template
- Written by Tom Elliott Tom Elliott
- Published: 03 March 2010 03 March 2010
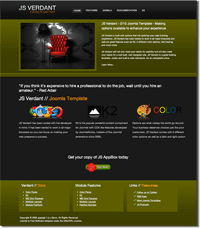 Colorful. Flexible. Powerful. Searchable. Modern, clean, and versatile. That's our new JS Verdant template.
Built on our customized Joomlshack 960 grid system, Verdant is lightweight, source-ordered, and fast loading for maximum SEO performance. And it's ready to style the outstanding K2 content extension!
Along with our many standard features, we've added a couple new cuts to this multi-faceted gem, including:
- Page background color customization- change the color of your page background with a simple hex code in the template parameters
- 5 Colors and Light and Dark options- make your banner space pop above the fold with this instant change
- CSS3 fueled- CSS3 styles that degrade gracefully for older browsers
- Full vs Static Width- change the extent of your background color with a simple parameter change
- Easy Title Customizations- make your heading stand out with easy-to-use title parameters
Verdant comes ready to style K2, the incredible content extension, and is easily customize with fully commented CSS overrides.
Here's a list of the full Verdant feature set:
Read more: Verdant: Colorful, powerful, flexible Joomla template
How to debug your Joomla code with FirePHP
- Written by Joseph LeBlanc Joseph LeBlanc
- Published: 22 February 2010 22 February 2010
Debugging PHP applications has always been a bit of a challenge, as the environment is so distributed. At the minimum, there is a web server, the PHP interpreter, and the web browser. While there are tools that add debugging environments to PHP (such as XDebug), you don’t always have access to install them on the server you’re working with.
Fortunately, you can gain some reasonable debugging capabilities through FirePHP. When you want to dump objects or variables back to your browser without having to do so in your HTML, FirePHP is ready for the task. It can also be used to handle code traces and PHP errors.
FirePHP is both a Firebug extension and a PHP library. When the PHP library is in place, special HTTP headers containing JSON objects are created. Firebug reads the HTTP headers, decodes the JSON, then shows the variables in the console. Since the output body is unaffected, it is extremely useful for debugging XML, JSON, PDFs, images, or other non-HTML output generated in PHP.
Changing Joomla's Date Format to American Format
- Written by Forest Linden Forest Linden
- Published: 18 February 2010 18 February 2010
For one reason or another, American's preferred date format (e.g., February 25, 2010) is not an option within Joomla.
I know there's many people who use Joomla who are not in the U.S., but for those of you who are, if you'd like to change the date format in Joomla to the American format, this one's for you.
You can see the date format appear in a number of different places, but one common place you'll see it is in an article's date created information:
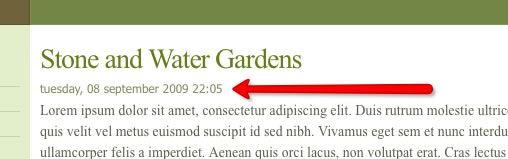
The date format you see in the above image is Joomla's default date format, which is the international date format.
I'll show you two ways you can change this date format: 1) By editing one of Joomla's core files, and 2) installing a US language pack.
Here's how to change the international date format to Month Day, Year (while also removing the time stamp) by editing one of Joomla's core files.
1) Using your ftp software, such as Filezilla, navigate to the en-GB.ini file, which is in this location: your root directory/languages/en-GB/en-GB.ini
2) Open the en-GB.ini file with your plain text editor and look for this line of code towards the top of the file:
DATE_FORMAT_LC2=%A, %d %B %Y %H:%M
3) That's Linux date format code, and you'll need to change it to this:
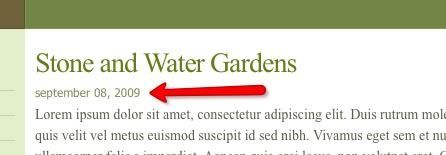
DATE_FORMAT_LC2=%B %d, %Y
4) Once you make that change, save the en-GB.ini file and upload it back to the en-GB directory.
5) Go back to the front of your site and refresh the page. You should see this date format now:
Now, here's an important note to keep in mind: when you make this change, you're editing a core Joomla file. When you upgrade Joomla, there's a chance that there will be a new language directory, a new en-GB directory, or a new en-GB.ini file.
If that's the case, when you upgrade, your date change will be lost, since the en-GB.ini file that you edited will be overwritten by the new one in the Joomla upgrade package.
If you're fine with potentially needing to make this simple change each time you upgrade, then you're fine.
If you want to avoid that, there's another way to make this change: install the American Language pack by Dave Morgan.
Here's how:
1) Go to this page and download the language pack by clicking on the download link:
2) Install it in Joomla by going to Extensions>Install Uninstall.
Click on Browse, find the language pack file you downloaded, and double click on it when you find it.
Then click on Upload and Install on the Extension Manager page.
3) After it's been successfully installed, go to Extensions>Language Manager.
4) Check the radio button next to English(United States) and then click on the Defualt icon in the upper right of the page to make this language pack your default language pack.
5) Then, go to the front of your site and refresh the page, or navigate to a page that has a date showing and you should see a date format like this:

If you want to edit how that date format is appearing, such as taking the time stamp off, go to language/en-US and open the en-US.ini file. Change the date format for LC2 in a similar way that I described above for editing the en-GB.ini file.
For example, if you wanted to remove the time stamp, you would delete the %H:%M on the line of code for the DATE_FORMAT_LC2 within the en-US.ini file. Currently, that line of code is on line 11 of that file.
When you update Joomla, your date format changes will remain in tact as long as the core Joomla team doesn't create a new language directory named en-US as a new option.
Joomlashack University loves CMS Expo
- Written by Tom Elliott Tom Elliott
- Published: 16 February 2010 16 February 2010
![]() CMS Expo IV is ON for this May 3-5th in Chicago, and it's bigger, better, and busier than ever! Joomlashack University is very proud to sponsor this amazing and can't-miss event.
CMS Expo IV is ON for this May 3-5th in Chicago, and it's bigger, better, and busier than ever! Joomlashack University is very proud to sponsor this amazing and can't-miss event.
Not only is CMS Expo a hotbed of the world's leading Joomla experts, developers, and trainers, the conference has expanded to include learning tracks and presentations on a wide range of the world's best open source Content Management Systems.