The Joomlashack Blog
New Intermediate Online Joomla Training at Joomlashack
- Written by Tom Elliott Tom Elliott
- Published: 08 February 2010 08 February 2010
Take your Joomla skills to the next level with our Intermediate Joomla Course from Joomlashack University, the leading online Joomla training course.
When we launched Joomlashack University back in October, we knew Joomla beginners would flock to our rich library of step-by-step videos and written tutorials. And then they did in droves. But what to do when they're ready for more?
The Intermediate Joomla Course
With our first crop of students ready to move into new learning territory, we've loaded the Intermediate course with over 2.5 hours of new video tutorials, including:
Read more: New Intermediate Online Joomla Training at Joomlashack
Importing RSS Feeds Into Joomla Articles
- Written by Steve Burge Steve Burge
- Published: 08 February 2010 08 February 2010
This tutorial will show you how to take an RSS feed and import it into your Joomla site. Each item on the RSS feed will become a separate Joomla article. We use this technique for a couple purposes:
- Distributing our content to other Joomla sites. For example, we use this technique to showing these tutorials on other sites in our network.
- Importing blogs and news on a particular topic from other sites. This way people can read them all in one place.
We're going to use a component called 4RSS from 4RSS.com.
Installing and Configuring 4RSS
- Go to the 4RSS page on the Joomla Extensions Directory and download the file.
- You'll see a file on your desktop with a name very similar to com_4ss_1.3.06.zip
- Go to the administrator area of your Joomla site, then Extensions >> Install / Uninstall.
- Click "Browse" to locate the package file and then click "Upload File and Install".
- Go to Components >> 4RSS
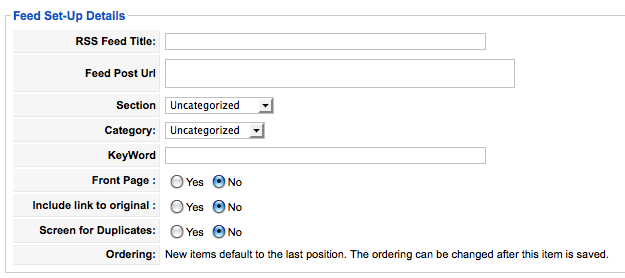
- Click "New" in the top-right corner and you'll see a screen like the one below:

These are the settings you'll need to enter:
- RSS Feed Title: This is just for your own use. It will never show on the front-end.
- Feed Post URL: The address of the RSS feed you want to import.
- Section / Category: Where the new articles will be created.
- KeyWord: If you'd only like to import articles that mention a particular keyword, insert it here.
- Frontpage: Do you want to publish these to the frontpage of your site?
- Include link to original: Highly recommended to click "Yes" in nearly all circumstance. This will insert a link back to the article's original location with the text "read full article". You don't want search engines to get confused as to which page is the original.
- Screen for Duplicates: Should 4RSS check to see whether any feeds have already been imported? Again, "Yes" is highly recommended.
Importing the RSS Feeds
Now that you're set up, there are two ways to import feeds:
- Manually: In Components >> 4RSS, select the feeds you want to import and then click "Post" in the top-right corner.
- Automatically: In Components >> 4RSS you can click the "4RSS CRON" tab. This is a little trickier and will depend on your server for the correct setup. Each hosting company will have a different place to setup cron jobs so you will need to check with them. The developer's support forum may be able to help. One common entry that may work is:
Php -q/home/......./public_html/administrator/com_4rss/cronjob_4rss/cronjob.php > /dev/null 2>&1
5 Useful JCE Features That People Miss
- Written by Steve Burge Steve Burge
- Published: 04 February 2010 04 February 2010
It's no secret that Joomla's default editor TinyMCE lacks quite a few features. We often recommend that people upgrade to Joomla Content Editor (JCE). You can click here to find full instructions on how to install JCE, including a video.
What we're going to cover in this tutorial are 5 really great features of JCE that people often don't realise are there:
1) Cut and Paste Images Into Different Folders
One common complaint about Joomla's default Media Manager is that you can't move images around. Once you've uploaded an image to one location, you'll need to delete it and re-upload it if you want it in a different folder. JCE allows you to do that:
- Click on the "Image" button in the JCE editor:

- You'll see a pop-up screen with the title "Image Manager". Select an image and look on the right-hand side for the pair of scissors. Click this button:

- You can now browse to another folder and click the "Paste" button, also on the right-hand side:

2) Upload Images in Bulk
A second complaint about the Media Manager is that images have to be uploaded one-by-one. JCE offers the ability to upload in bulk.
- As in Part 1, click on the image button in the JCE Editor.
- Click on the "upload" button on the middle-right of the screen:

- Keep clicking "Add" to select more images from your desktop.
- When you're ready, click "Upload" and all your images will be uploaded.

3) Link Directly to Any File in Your Media Manager
With the basic Joomla editor you're faced with difficult time linking to any documents that you've uploaded. A lot of people find this a problem because they need to allow their visitors to download PDF, Word and other files. With the basic editor you actually need to know the exact location of the file if you want link to it:

With JCE, this process is much easier:
- Select some text in your article. This is likely to be something such as "Click here to download the PDF". The click the link button in JCE:

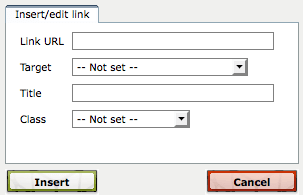
- You'll see a pop-up screen with the title "Advanced Link". In the top-right hand corner, you'll see a small button that will allow you to browse all the files inside the /images/stories/ folder:

- Select the file you want to link to and then click "Insert". JCE will automatically generate a link to that file for you.
4) Different Editing Options for Different Users
The JCE Editor is a very powerful tool with a lot of options. In fact, it can sometimes have too many options. You can easily imagine some non-technical users getting a little intimidated for 4 rows of buttons like this:

JCE allows you to add or remove these features, depending on what your users need.
- Go to Components >> JCE Administrator >> Groups.
- Here you can create different groups and assign varied features to different users. We'll use the existing "Default" group as an example.
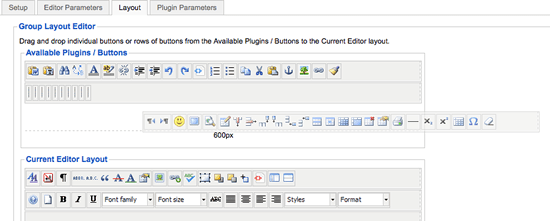
- Click on "Default" and then the "Layout" tab at the top.
- The top box called "Available Plugins / Buttons" is the list of disabled features. The bottom box called "Current Editor Layout" is the list of active features. You can drag and drop individual features or even entire rows of features between these two boxes:

- We use this to make article submission much easier for our guests. For example, on Joomlashack.com we give writers these options:

- If you have a user who is really clumsy, you might decide to restrict their options even more :)

5) Restricting Users to their Own Upload Folders
An important security feature that many people need is the ability to restrict users to their own upload folder. They don't want John to be able to browse around the site and see all the documents that Jane has uploaded. They don't want one client being able to find files destined for another client. JCE can do that too.
- Go to Components >> JCE Administrator >> Groups.
- Again, click on the existing "Default" group as an example.
- Click the "Editor Parameters" tab and scroll to the bottom where you'll see "File Directory Path".
- In this field you'll be able to choose the settings for people's folders. Some instructions are available in the yellow pop-up box:

- The setting I often use is images/stories/$username This will automatically create a folder for each person based on their username and they'll only be able to upload to that folder.
- Finally, this setting only works inside JCE so you 'll need to unpublish the normal Joomla image button. Go to Extensions >> Plugin Manager and disable the plugin called "Editor Button - Image".
How to Fix Joomla Content Plugins
- Written by Joseph LeBlanc Joseph LeBlanc
- Published: 01 February 2010 01 February 2010
Long-time users of Joomla are quite familiar with content plugins. When you want to take some user-entered text and reformat it into something else, there’s nothing quite as handy as having a content plugin ready to do your bidding.
However, Joomla 1.5 brought some subtle behavior changes. In Joomla 1.0, content plugins act on both articles entered through the Article Manager, as well as HTML entered in user created modules. When a Joomla 1.0 content plugin is recoded for 1.5, the original effect still takes place on content items, but module output is left unchanged.
What happened? Content plugins in Joomla 1.5 are designed to only act on articles managed through the Article Manager. This will seem inconvenient to people used to the old behavior, but there is a good reason for this change. While many content plugins reformat user-entered HTML, others add markup near the article title or just after an article is output. Also, some content plugins are designed to do additional tasks when articles are saved. These actions do not make sense within the context of a module, so content plugins no longer run on them.
While this good in that it enforces consistency, it also poses a problem. Now that content plugins only work on articles, how do you reformat markup coming from modules? Fortunately, there are a couple of workarounds in Joomla 1.5 achieving similar (if not better) results.
Our JomSocial 1.6 templates are ready
- Written by Tom Elliott Tom Elliott
- Published: 28 January 2010 28 January 2010
Our friends over at JomSocial have been working furiously on a major new release. And now it's here and ready for your free trial!
JOMSOCIAL USERS: Joomlashack has two templates ready for the new JomSocial 1.6. Check out our JS Community and JS AppBox templates, on sale now!
JomSocial 1.6 has a slew of new features and improvements, including:
- Amazon S3 Storage support
- Massively enhanced privacy support
- Improved activity stream
- New API for new possibilities
- Modules everywhere
- And tons of refinement and bug fixes
Did you know JomSocial offers a one month free trial for just $1?
Learn all about JomSocial and its many improvements with version 1.6.
AppBox: A Fast Joomla Template Full of Tools
- Written by Tom Elliott Tom Elliott
- Published: 28 January 2010 28 January 2010
 What is JS AppBox? A killer SEO, fast-loading template ready and waiting to style some of the best extensions available in the Joomlaverse.
AppBox is a native Joomla 1.5 template built to visually integrate Joomla and three of its best extensions: K2, Kunena Forum, and the must-have JomSocial.
Not yet familar with K2? K2 is the powerful content component that gives you enormous flexibility to place and display your content differently than your typical "out of the box" Joomla layout style. Learn more about K2 and AppBox.
JS AppBox is a web 2.0 template optimized with raw SEO power and easy style integration with best-of-breed tools to make your site engaging and sticky.
Check out these many features:
Congresssional Joomla Web Defacements
- Written by Tom Cannan Tom Cannan
- Published: 28 January 2010 28 January 2010
"Congressional Web Site Defacements Follow the State of the Union"
- Praetorian Prefect
An interesting problem that we as the US have is our denial of Cyberwar. While this post isn't exactly about that, it's close. Last Wednesday night during or after the President's State of the Union Address, several congressional websites were hacked by Red Eye Crew. Why is this of interest? According to Praetorian Prefect, they were all running Joomla!
How To Send Email from Your Joomla Extension
- Written by Steve Burge Steve Burge
- Published: 26 January 2010 26 January 2010
Because of it ubiquitous nature, automatic emailing is something that many clients expect. People want to be notified immediately of changes on their sites -- when a new article has been submitted, or a blog comment has been posted. Joomla! already provides some of this functionality out of the box by notifying administrators when a user has registered on their site. You, however, may find yourself needing to implement emailing in your own components. As you may have already guessed, Joomla! provides a very helpful class for this: JMail.
Shack Pack for Schools makes school websites easier
- Written by Tom Elliott Tom Elliott
- Published: 24 January 2010 24 January 2010
School Websites are challenging. Why not let the Shack Pack for Schools make it easier?
Back in 2007 Joomlashack released its first Shack Pack for Schools, built for Joomla 1.0.x and sporting our free Education template.
Now we're back with a new Joomla 1.5 version completely rebuilt to work with our Inspirion template, and stuffed with several outstanding extensions!
School Website Admins: the Shack Pack for Schools saves you many hours of research, fiddling, and Joomla configuring.
Our team of Joomla experts (some of whom are former high school teachers and administrators) have put together all of the tools and content you need to get started- all in one instant install package!
What's included in the Shack Pack?
- Instant Joomla installer to create the full example site with content, several free and useful extensions, and relevant content. You'll start with a site that looks exactly like our "Shack Pack for Schools" demo.
- Our Inspirion template, a $47 value with seven color packs included!
- Access to our forum for Educators using Joomla where your questions can be answered
For just $97, you'll get a complete school website ready for your immediate tweaking and configuration.
Read more: Shack Pack for Schools makes school websites easier
How to Create Select Lists in Joomla!
- Written by Steve Burge Steve Burge
- Published: 14 January 2010 14 January 2010
If you've worked with any kind of database-driven web application, you know that HTML forms are the foundation of the user's interaction with the database. Applications use forms to take input from the user and store it or use it to manipulate existing data. Unfortunately, HTML forms can potentially be quite tedious to write. In this article, we will look at a handful of helpful functions that Joomla! provides to save you time preparing your forms.


.png)
