The Joomlashack Blog
How to Create a Joomla Site Quickly
- Written by Steve Burge Steve Burge
- Published: 10 January 2010 10 January 2010
In our classes we've talk about the SCAM workflow that makes building Joomla 1.5 websites much easier:
- S: Go to Section Manager and create sections
- C: Go to Category Manager and create categories
- A: Go to Article Manager and create articles
- M: Go to Menus and create menu links
That 4-step process is the key to building a site. A lot of people's confusion with Joomla comes from not knowing about that workflow. They try to create articles first and then realise they have no way to organize them. Or they create sections, categories and articles then wonder why they aren't visible on the site (they haven't made a menu link so that people can see them).
But what if this workflow could be done much more quickly? That's what we're going to explain in this tutorial using a component called MassContent.
- Step 1: Go to Baticore.com and download Mass Content via this link.
- Step 2: Go to Extensions >> Install / Uninstall and install the file (called com_masscontent)
- Step 3: Go to Components >> Mass Content >> Create Mass Sections
- Step 4: Enter the titles for all your sections, check the box saying "Copy Title to Alias" and then click Save.

- Step 5: Go to "Create Mass Categories" and repeat the process. Make sure you put the categories in the correct section, using the dropdown on the right-hand side.

- Step 6: Go to "Create Mass Content".
- Step 7: Click on "Parameters" in the top-right and choose your setting. How many articles do you want to create? Do you want to use the WYSIWYG editor?
- Step 8: Write your articles. You can either just write the title and fill in the rest later or you can actually create the full articles directly from this screen.
Video on How to Use Mass Content
How to Create a Joomla RSS Feed
- Written by Steve Burge Steve Burge
- Published: 10 January 2010 10 January 2010
- Step 1: Go to the RSS Feeds section on Joomla.org.
- Step 2: Download the Ninja RSS Syndicator.
- Step 3: Install Ninja RSS via the Joomla installer.
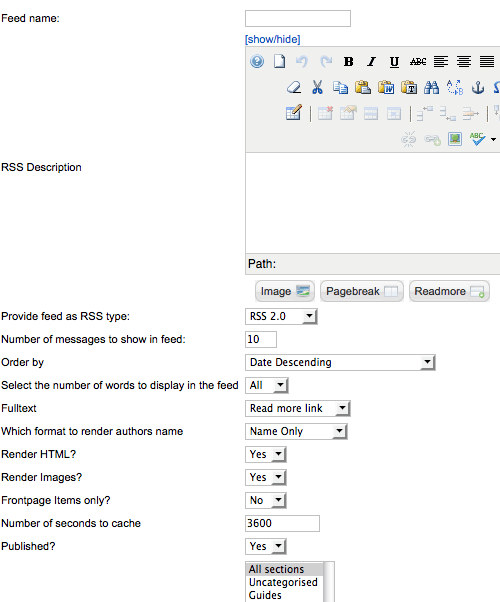
- Step 4: Go to Components >> Ninja RSS and click "New"
- Step 5: Fill in the information requested. Most of this fields are self-explanatory. You can happily just give your feed a name and click save.
Collecting Data on Your RSS Feed
- Step 6: After you've saved your feed, copy the URL or save it into a text editor.
- Step 7: Go to https://feedburner.google.com and login.
- Step 8: Enter the URL for your RSS feed into this box:

- Step 8: Give your feed a name and URL. Make sure to write down the name of your new feed URL.
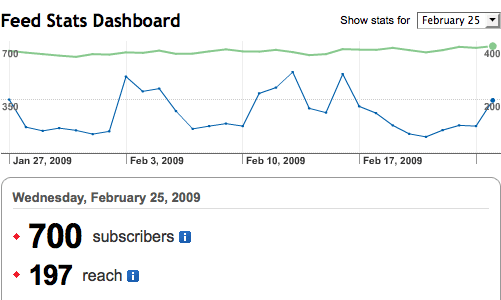
- Step 9: Over the next few weeks, you can login back into Feedburner and see detailed information about how many people are subscribing to your feed:
Allowing Search Engines and Visitors to Find Your RSS Feed
- Step 10: Add this to the head of your template:
<link rel="alternate" type="application/rss+xml" title="RSS 2.0" href="https://feedaddress.com" /> - Step 11: Go to https://siteexplorer.search.yahoo.com/submit and submit your RSS feed.
How to Create a Blog Using Joomla
- Written by Steve Burge Steve Burge
- Published: 10 January 2010 10 January 2010
People often ask "what's the best blog extension for Joomla?". Our answer: "how about Joomla itself?".
We use Joomla for our blog on here at Joomlashack and get 10s of 1000s of visitors every month. Here's how to set up a blog using Joomla:
- Step 1: Go to Content >> Section Manager and make a section called "Blog".
- Step 2: Go to Content >> Category Manager and make categories for your blog. Make sure to assign them to the "Blog" category.
- Step 3: Go to Content >> Article Manager and write the first few articles for your blog. When you're writing each article, be sure to click the "Read More" button at the bottom of the page to insert the red line. This will create an intro text for the article. Everything before the red line will be the intro. To get to the rest of the article, people will need to click "Read More".

- Step 4: Go to Menus >> Main Menu >> New >> Articles >> Section Blog Layout and choose the "Blog" section that you created in Step 1.
- Step 5: Go to the front of your site and click on the new link. If you don't like what you see, you can go back to the menu link from Step 4 and change the "Parameters" on the right-hand side. Common things to change are the number of articles on each page and the number of columns.
Video on building a blog with Joomla
How to Change the Logo on Joomla Templates
- Written by Steve Burge Steve Burge
- Published: 10 January 2010 10 January 2010
- Step 1: Go and download the Firefox browser, if you haven't done so yet: https://www.mozilla.com/en-US/firefox/personal.html. Firefox is much better than Internet Explorer or Safari for working on websites.
- Step 2: We're going to install an extra toolbar for Firefox. It is called the "Web Developer" toolbar. It was already installed on the Firefox we used in the Joomla beginners classes: https://addons.mozilla.org/en-US/firefox/addon/60
- Step 3: Click "Add to Firefox" and follow the instructions, including restarting Firefox.
- Step 4: The next time you open Firefox, you will see a list of links that starts with "Disable", "Cookies", "CSS" and ends in "Options"
- Step 5: Browse to the website where you want to change the logo. We're going to use https://joomla.org for this example.
- Step 6: In the toolbar, click on "Images" which is the 5th link from the left. Then click "View Image Information" from the dropdown.
- Step 7: You will now see a list of all the images on the site.
- Step 8: Scroll down until you see the logo. You will see two pieces of information about it: Location ( https://cdn.joomla.org/images/logo.png ) and Size ( Width = 235 pixels, Height = 40 pixels ).
- Step 9: You need to make a new logo that is the same width and height as the old.
- Step 10: Use your favorite file manager to upload the new logo to the location you found in Step 8. It is better to rename rather than delete the old logo. You could call it logo-backup.png for example.
How to Change the Image Folder in Joomla
- Written by Steve Burge Steve Burge
- Published: 10 January 2010 10 January 2010
In our beginner classes we explain a Joomla quirk ... all images should go in the /images/stories folder to make them easier to use. However, some people are taking over sites where that hasn't been done. Here's how to change the place where images are put:
- Step 1: Login to the administrator area of your Joomla website.
- Step 2: Go to Site >> Global Configuration.
- Step 3: Global Configuration is divided into 3 sections: Site, System, and Server. Click on "System".
- Step 4: Scroll down to "Media Settings".
- Step 5: In the field "Path to Image Folder", change where you'd like images to be placed. It is most likely that'll you want to change this from /images/stories to just /images/
- Step 6: Click Save.

How to Change the Favicon on Your Joomla Site
- Written by Steve Burge Steve Burge
- Published: 10 January 2010 10 January 2010
The favicon is the small image that people use to identify your site. It appears in their bookmarks, in their browser bar and in any tabs that they have open:

By default, Joomla uses the official Joomla logo. Here's how to change the image to something that reflects your website:
- Step 1: Find the image that you'd like to use. The best favicons are normally square and don't have a great of detail.
- Step 2: Either resize the image yourself to 16 pixels high and 16 pixels wide, or you can use a website such as https://www.favicon.cc to resize it for you.
- Step 3: Make sure that the image is called favicon.ico
- Step 4: You will need to upload the image via FTP or your favorite file manager. The location you need to upload to will look like this /templates/your-template-name/. That's all. You don't need to place it in your template's images directory or even Joomla's image directory. Just place it in your template's main folder.
A Note of Caution:
Many browsers use "caching" which means they show a version of the page from several minutes ago. That means that your browser may not show your new favicon immediately. You may need to delete your browser cache (instructions are here) and restart your browser to see the change.
How to Change Joomla's Read More Text
- Written by Steve Burge Steve Burge
- Published: 10 January 2010 10 January 2010
One of the most famous blogging experts is Brain Clark on Copyblogger. He recently wrote a post about the “Click Here problem”.
He quotes research that shows how often people click on different kinds of link:
- “Click to continue”: 8.53%
- “Continue to article”: 3.3%
- “Read more”: 1.8%

The main problem is that "Read More" doesn't tell people what to do or what they'll be reading about. Well, you can probably guess which of these options Joomla uses by default.
Fortunately, it is possible to make Joomla's Read More more descriptive and useful.
Here's how you do it:
- Go to the administrator area of your site and Content >> Article Manager.
- In the parameters of your article, under 'Parameters(Advanced)', enter the text you would like the article to use for the Read More link. If you leave this field blank, Joomla will use the default "Read More".
- This is how it will look on the front end of your site:

If you don't want to do this yourself for every article, both sh404SEF and SEF Advance are components that will optimize your URLs and also insert the article title into the read more link. Finally, if you're not using either of those, click here to find a code hack available to insert the title automatically (notice what we did?  ).
).
How to Block Spam Registrations in Joomla
- Written by Steve Burge Steve Burge
- Published: 10 January 2010 10 January 2010
If you run a website that allows registration, you're probably familiar with the parade of fake addresses that people use: mickymouse [at] hotmail.com, email [at] email.com and so on. You've also seen spam addresses often ending in .ru, .biz, info or similar.
This week we're going to show you how to check registration emails to make sure they are using legitimate. This can cut down on the number of spam comments, forum posts and other submissions you have to deal with.
We're going to use a plugin called Registration Validator. Here's how you do it:
- Register for an account at CEDit.biz and confirm your account.
- Log in and Download the Registration Validator plugin.
- In the administration area of your Joomla site, go to Extensions >> Install / Uninstall and upload the file.
- In the administration area of your Joomla site, go to Extensions >> Plugin Manager >> System - Registration Validator and enable the plugin.
- Inside the plugin you can change the settings.
Once the plugin is enabled your registration form will have add another layer of protection to your site from spammers.
How to Add Social Bookmarking / Networking to Joomla Articles
- Written by Steve Burge Steve Burge
- Published: 10 January 2010 10 January 2010
Social bookmarking and networking sites are very popular these days, and a must for those who wish to share their content with the broadest audience possible. Allowing your visitors to share your content with those in their 'network' is a great way to market your site.
This week we'll walk you through how to set up a tool to allow quick sharing of your articles in the most popular social bookmarking/networking sites.
We're going to use a plugin called Share This
Here's how you do it:
- Download the Share This plugin.
- In the administration area of your Joomla site, go to Extensions >> Install / Uninstall and upload the file to install.
- In the administration area of your Joomla site, go to Extensions >> Plugins and open the Share This plugin.
- On the right there are parameters allowing you to choose which services you would like to have displayed. Over 35 of the most common sites are included. You can also change the color and location to match your site.
- Enable the plugin, save the changes and start sharing your content with others.
One reason we recommend Share This over the alternatives is that its very discreet. Other bookmarking plugins take up a lot of space but Share This has only a small link that pops-up to reveal more options. There's a demo available here.
How to Add Joomla Administrator Authentication
- Written by Steve Burge Steve Burge
- Published: 10 January 2010 10 January 2010
This week we'll walk you through how to set up a little bit of extra security that will hide your Joomla Admin area from prying hackers and bots, requiring authentication to log in.
We're going to use a plugin called jSecureAuthentication.
Here's how you do it:
- Download the jSecureAuthentication plugin from Joomla Service Provider.
- In the administration area of your Joomla site, go to Extensions >> Install / Uninstall and upload the file to install.
- In the administration area of your Joomla site, go to Extensions >> Plugins and open the System - jSecure Authentication
- Enable the plugin, and on the right in the parameters insert your Key in the field - this will be your 'secret' key to use for authentication when accessing the Joomla admin area.
- Save the changes and log out of the admin. To get to your new admin area you will go to https://example.com/administrator/?secretkey (don't forget the ? before the secret key)
Using this plugin you can also set a custom redirect so that if someone were to try and access the default admin area at /administrator you can customize the message.
*We'll take this opportunity to remind you that while this is another step to help secure your Joomla site, it is no replacement for keeping your Joomla core files AND your extension files up to date. Make sure you're running the most recent versions in order to have the most secure site.