The Joomlashack Blog
Reset Joomla Hits to Zero
- Written by Steve Burge Steve Burge
- Published: 24 September 2010 24 September 2010
Often if you're developing a Joomla site you may visit Joomla articles many times before launch. That means you can easily launch your site with some articles showing 100, 200 or more hits.
If you'd like to have a clean slate and reset the number of hits to zero, here's how to do it. First we'll show you how to reset the hits for one article, then for your whole site.
Reset the Hits for One Article
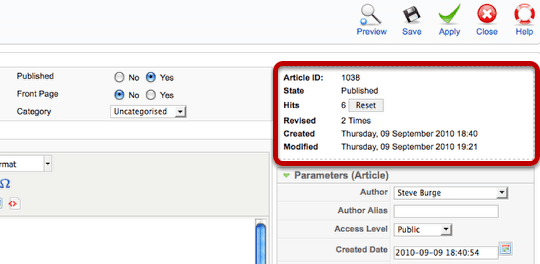
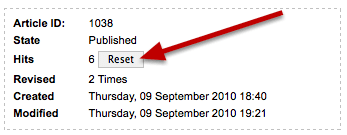
Inside each article there will be a "Reset" button on the right-hand side to change your hits back to zero.
Reset All the Hits for All Your Articles
In order to reset all the hits for your site, you'll need to access your database. First of all, we need to double-check the name of the database we're using.
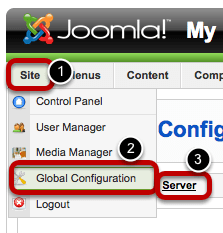
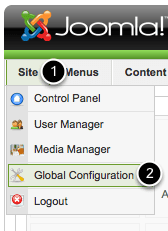
Go to Site >> Global Configuration and click on Server.

On the right-hand side under Database Settings, make a note of both your Database and Database Prefix.
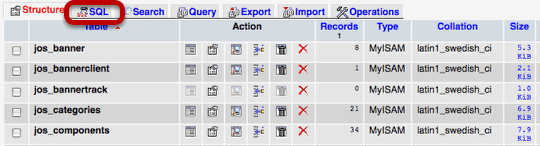
We'll now need to access our database. Many hosting companies will give you access via phpMyAdmin. If you don't know how to get there, ask your hosting company.
Once you are inside phpMyAdmin, click on your database name that you found in the previous step. Then click on "SQL" at the top of the page.
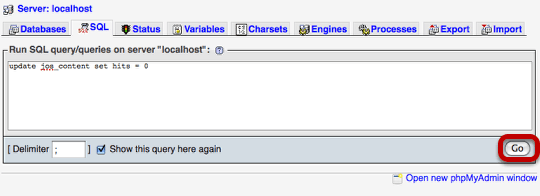
Enter this code into the box:
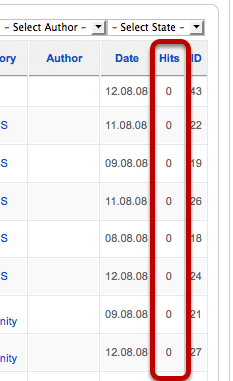
update jos_content set hits = 0Volia!
The Ultimate Joomla SEF URL Guide
- Written by Steve Burge Steve Burge
- Published: 23 September 2010 23 September 2010
This is a 4 part guide to setting up your URLs correctly in Joomla.
It's just about the most detailed guide you'll find anywhere online, hence the name! We present you with the Ultimate Joomla SEF URL Guide:
- Part 1: Why Use Search Engine Friendly (SEF) URLs?
- Part 2: How to Set Up Joomla's SEF URLs
- Part 3: Troubleshooting Joomla's SEF URLs
- Part 4: Using an Extra Search Engine Friendly URL Extension
Introduction: What Are Search Engine Friendly URLs
Very simply - they are URLs that contain information:
- Is a a Search Engine Friendly URL: /joomla-training/
- Is not a Search Engine Friendly URL: /index.php?option=com_content&view=article&id=25&Itemid=28
Part 1: Why Use Search Engine Friendly (SEF) URLs?
Better for Search Engines
Search for keywords in Google and they'll be highlighted whether they appear in the page title, description, domain or ... the URL. Check out this search for in Google:

In this SEOMoz study over 30 SEO experts were polled on the most important factors in ranking well. Coming in at number #6 ... "Keyword Use in Page URL"
Better for Humans
- Imagine calling up your customer, asking them to visit a page on your site and telling them to go to example.com/index.php?option=com_content&view=article&id=25&Itemid=28. Pretty difficult, right? Much easier to ask them to go to example.com/about-us. People can understand that URLs, then can remember them, than can say them. They also get a very good idea of what the page is about.
- Studies have shown that people are more likely to click through if they see these readable URLs in search results.
- These URLs can also act as a pathway to help people understand where they are on your site.
Better for You When You Move Your Site
The way I often try to explain this .... Imagine if you had a coffee shop with a steady stream of customers. One day you shut your doors and moved to the other side of town. Imagine how many of them would bother to travel the extra 20 minutes to visit you. Now imagine that you didn't even put a note on the door telling them where you'd gone. That's essentially what most people do when they migrate sites. They break all their URLs and often don't even bother to redirect them. From my experience, how people manage the URLs during a migration has a huge effect on visitors numbers:
- Kept the same URLs: no drop in traffic
- 301 redirects from old URLs to new: Around a 25% drop in traffic. (read one example here)
- Broke URLs with no redirects: A 50% or greater drop in traffic
Now imagine how much easier it is to migrate /about-us/ and /contact-us/ URLs than it is to migrate URLs like this: index.php?option=com_content&task=view&id=37
What we're going to do now is show you how to create search engine friendly URLs in Joomla.
Part 2: How to Set Up Joomla's Search Engine Friendly URLs
You'll now see a screen like the one below on the right-hand side:
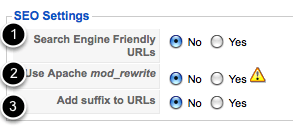
Under "SEO Settings" there are three options. Here is how the three options will change your URLs if you set them to yes:
- /index.php/about-joomla
- /about-joomla
- /about-joomla.html
My personal preference is to check Options 1 and 2. I don't see the point of adding .html on the end of URLs because it makes them longer and besides: we're not building HTML sites any longer.
Much better, wouldn't you agree?
Where Do These URLs Come From?
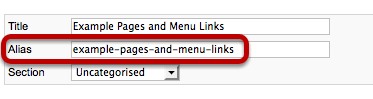
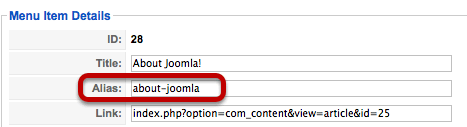
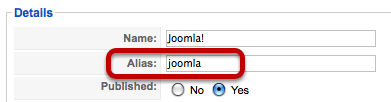
Almost everywhere you go in Joomla you'll see a field called "Alias". This is basically means "URL".
If you don't fill it in, Joomla will automatically do it for you. It will clean up any usual punctuation and fill in in spaces with a hyphen.
If you do want to fill it in, you can choose your own URL for the page. One common reason for doing this is to have a long interesting title on the page: "Ten Great Reasons to Use Joomla's Search Engine Friendly URLs" but still have a short URL such as "joomla-sef".
Inside articles:
Inside menu links:
Inside weblinks:
Part 3: Troubleshooting Joomla's SEF URLs
Did that get your attention? Changing these settings is useful, but it is the most common way to cause temporary problems with your site. You'll know that you've made a mistake if your site start's looking like the image above.
However, don't worry, there's no real harm done. If you see this, immediately go back to Administrator >> Site >> Global Configuration and change all the settings to "No". Your site will be back to normal.
However, the solution is not always straightforward and each hosting company is a little different. Here are some ways to fix the problem. I'm going to put them in order - try the first solutions first then move on the trickier solutions if you still have problems.
1) Rename the htaccess.txt file
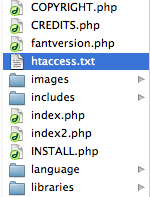
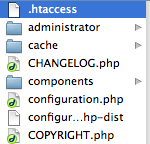
Login via a file manager so that you can access your Joomla files. You're looking for a file called htaccess.txt that is the main area of your Joomla files. You're going to do just one thing: rename that file from htaccess.txt to .htaccess:
Now go and check whether your URLs are working. If not, let's move on to the next step:
2) Check Your Server
This will check to see whether your server is correctly set up with a feature called mod_rewrite which, well ... rewrites your URLs.
1) Go to Administrator >> Site >> Global Configuration and turn on all 3 SEO settings. 2) Rename your htaccess.txt file to .htaccess as in the step above. 3) Next place only these following lines in your .htaccess:
Options +FollowSymLinks
 Redirect /joomla.html https://www.joomla.org
4) Point your browser to: https://www.yourdomainame.com/joomla.html 5) If it redirects you to joomla.org - then mod_rewrite is working. If it gives you an error - mod_rewrite is not working and you'll need to contact your host to get it setup.
Note: if your site is located in subdomain example "test" you need to insert in .htaccess as:
Options +FollowSymLinks
 Redirect /test/joomla.html https://www.joomla.org
That brings us to the next point:
3) Are You in a Sub-folder?
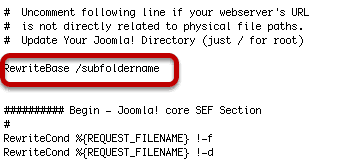
If your Joomla site is located in the sub-folder you may have another change to make. 1) Rename your htaccess.txt file to .htaccess as in the step above. 2) Find this line inside your .htaccess file:
# RewriteBase /RewriteBase /subfoldernameIf that doesn't work, you could also try simply removing the hash mark:
RewriteBase /Part 4: Using an Extra Search Engine Friendly URL Extension
It is possible to get even greater control and flexibility over your Joomla URLs by using a extension. Be warned, these components will also introduce extra complexity, so you they are only recommended if you are in a competitive industry and rankings are very important for you. Most sites will be fine with the basic Joomla SEF URLs that we talked about above.
SEF URL extensions go from very simple to very complex. If you are moving an existing, well-established site to Joomla, you would be well advised to use one of these to mimic your current URL structure so that you can keep your URLs unchanged.
Joomla 1.5 SEO Extensions
| Ace SEF [-] | Artio SEF [-] | SEF Advance [-] | sh404SEF [-] | |
| SEF URLs | 
|
|
|
|
| Metadata |
|
|
|
|
| No-Follow |
|
|
|
|
| 404 Pages |
|
|
|
|
| Cross-Linking |
|

|
|
|
| h1 tags |
|
|
|
|
| Alt tags |
|
|
|
|
| Price |  Free with link, $19 without
 |
Free with link, 29 Euros without |
40 Euros |
$37 |
| Unencrypted |
|
|
|
|
| Overall |
Very robust. Easy-to-use and has a medium number of options. Numerous plugins for other extensions. |
More features than SEF Advance, easier to use than sh404SEF. |
Less features but easier to use than the other SEF URL components. |
The most features but also the most complexity of all three SEF URL extensions. |
| Website Address | https://www.joomace.net | https://www.artio.net | https://www.sakic.net | https://dev.anything-digital.com |
Add Embed Codes to Joomla Articles
- Written by Steve Burge Steve Burge
- Published: 22 September 2010 22 September 2010
Update: we highly recommend the OSEmbed extension for embedding code in Joomla.
OSEmbed is the easiest way to embed anything in Joomla. Using just a URL, you can add YouTube videos, Google Maps, Facebook posts, X / Twitter tweets, Flickr images, Vimeo videos and over 60 other types of media.
OSEmbed really is the best way to embed everything in Joomla.
Edit Your Joomla Site's Offline Logo
- Written by Steve Burge Steve Burge
- Published: 22 September 2010 22 September 2010
This is Part 2 of a series of tutorials on Joomla's offline page:
- Part 1 (Beginner): Take your Joomla site offline
- Part 2 (Intermediate): Customize your Joomla offline page
- Part 3 (Advanced): Create a new Joomla offline page
If you have a normal Joomla site setup, anyone can come along and visit. Anyone can browse around and see what you're doing.
However, what happens if you're building site for a client? You don't want the whole world to see. The same is true if you're developing a site for yourself and aren't ready to make it public.
To solve this, Joomla allows you to work on a site in private where only you (and your client) can see it? Instructions for doing that are here. This tutorial follow on from a simpler set of instructions showing how to take your site offline.
Video Showing How to Edit Your Joomla Site's Offline Logo
Step-by-Step Tutorial Showing Edit Your Joomla Site's Offline Logo
However, if you're expecting vistiors you might want to customize the login page so that it contains your logo and your information. Here's how to do it:
Change the Logo

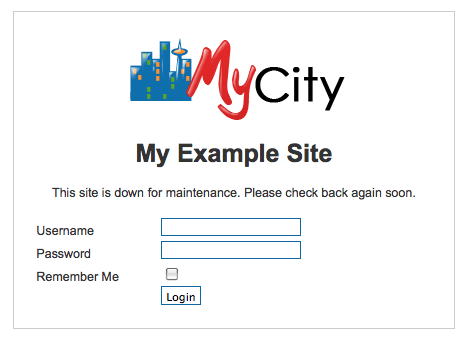
The default Joomla offline page has a large Joomla logo and the message "The site is down for maintenance. Please check again soon."
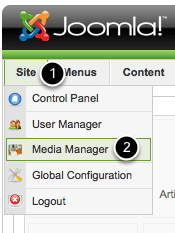
In order to to start changing the page, go to the Administrator area of your website, click "Site" and then "Media Manager".
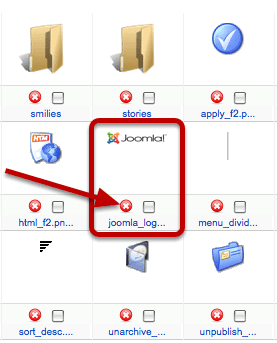
Click the red X next to the file called joomla_logo_black.jpg. We're going to delete that file so that you can upload your own.
Here's the thing ... you must make sure that the file you're uploading is also called joomla_logo_black.jpg. If it isn't yet, rename it.
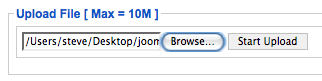
At the bottom of your screen, click "Browse" to find the image on your desktop. Then click "Start Upload". If your image had uploaded successfully you should be able to visit the front of your site and see the new logo.
Changing the Text
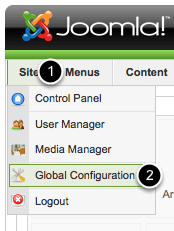
If you'd like to change the text that appears on your offline page, go to Site >> Global Configuration and you can edit two area:
- Offline Message
- Site Name
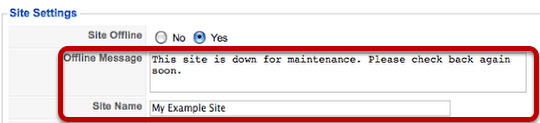
Click Save when you're done and visit your new offline page:
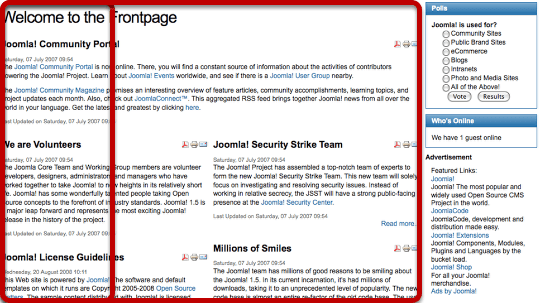
Remove Welcome to the Frontpage from Joomla
- Written by Steve Burge Steve Burge
- Published: 22 September 2010 22 September 2010
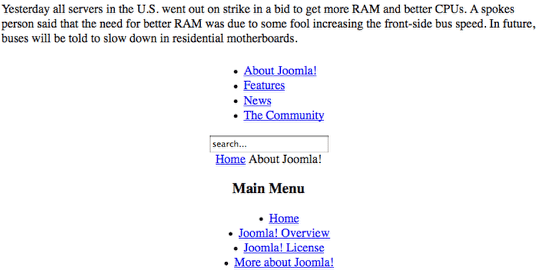
This is probably the most popular question we get asked by Joomla beginners setting up their first sites. "How do I remove the "Welcome to the Frontpage" text from my home page?"
Fortunately the answer is fairly simple (once you know it). Here's how to either remove or change that text:

Login and Go to Main Menu
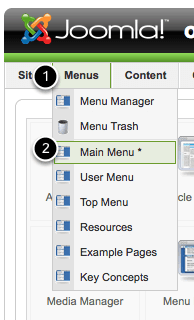
Login to the Administrator area of your site and click "Menus" then "Main Menu".
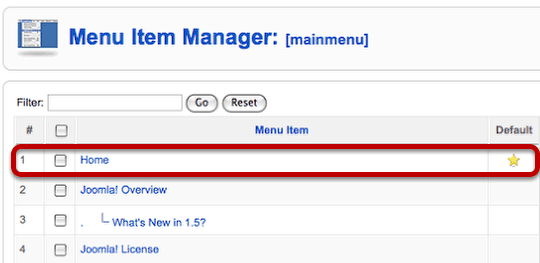
Click "Home" in the list of menu items.
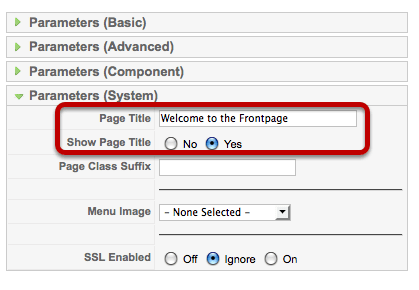
On the right-hand side, click "Parameters (System)".
There are two ways to fix this problem:
1) You can change "Welcome to the Frontpage" to something that matches your site.
2) You can set "Show Page Title" to "No" and just remove it entirely.
Introducing NUVO: Joomlashack's Latest Joomla Template!
- Written by JohnFlanagan JohnFlanagan
- Published: 22 September 2010 22 September 2010

Ultra-modern, sleek, powerful and designed to give you maximum control over the appearance of your site (without ever having to touch a line of HTML or CSS code), NUVO puts YOU in the driver's seat! Buckle up and have some fun. NUVO is waiting for you!
Read more: Introducing NUVO: Joomlashack's Latest Joomla Template!
Travertine, our Newest Joomla 1.7 Template
- Written by Joomlashack Joomlashack
- Published: 22 September 2010 22 September 2010
 Not one month after the launch of Joomla 1.7 and here it is: our 20th Joomla 1.7 Template, Travertine !
Versatile, customizable, powerful and designed to give you maximum control over the appearance of your site (without ever having to touch a line of HTML or CSS code), Travertine puts YOU in the driver's seat!
Understanding the Layout of the Bolt Template
- Written by Steve Burge Steve Burge
- Published: 20 September 2010 20 September 2010
Bolt is professional template that we provide free to our training students. It's simple, fast and loads as fast as a lightning bolt (hence the name!)
Because Bolt is not a complex template it's a great place to start learning Joomla template design. This tutorial will show you how to modify the column widths in Bolt. Hopefully it will also give you a good example of one method for creating flexible layouts:
Default Three Column Layout
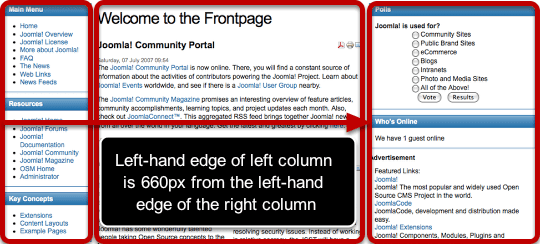
The first thing you should know is that the Bolt template is 960px wide. That's how much space we have to work with. By default, there are three elements taking up that space - the left column, center column and right column,. They are controlled by only four CSS elements.
First of all we have the left div. This div is straightforward and the most important element is the width:
#left {
 float:left;
 font-size:1.2em;
 overflow:hidden;
 width:160px;
 }
Next there is a second layer of CSS added to the left div. This only happens when there are three columns live on the site. The margin is 660px from the edge of the right column and actually controls the placement of left column. If this number were -770px then the left column would disappear off to the left-hand side of the site.
.threecolumns #left {
 margin:0 0 0 -660px;
 }
This is the CSS that controls the main body text. The left margin of 170px keeps the main body out of the way of the left column which is 160px wide.
.threecolumns #center {
 margin:0 10px 0 170px;
 width:480px;
 }
Finally we have the right column. This is even simpler than the left column - the main element is the width of 300px.
#right
 {
 float:left;
 font-size:1.2em;
 overflow:hidden;
 width:300px;
 }
Change the Right Column Width With Three Columns
We're going to reduce the right column size so that it is only 200px wide rather than 300px. Here's what we need to change.
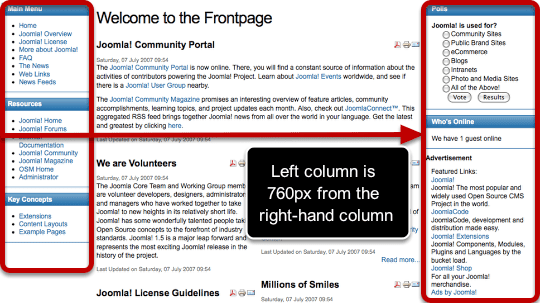
Remember that the left column position is definited by its margin from the right column. So if the right column shrinks, we need to increase the margin if we want the left column to stay in the same place. Because the right column is shrinking by 100px, we're going to increase the margin by 100px from 660px to 760px.
.threecolumns #left {
 margin:0 0 0 -760px;
 }
Also, we're going to allow the center of the site to take up the extra 100px so let's increase its width from 480px to 580px:
.threecolumns #center {
 margin:0 10px 0 170px;
 width:580px;
 }
Finally, we actually need to shrink the right column from 300px to 200px:
#right
 {
 float:left;
 font-size:1.2em;
 overflow:hidden;
 width:200px;
 }
Change the Left Column Width With Three Columns
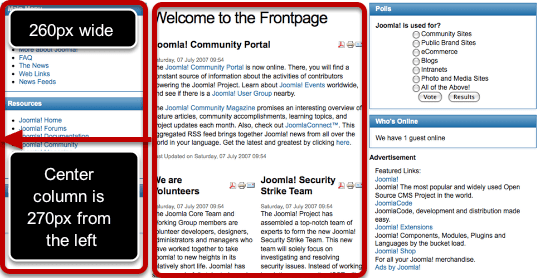
We're going to increase the left column size so that it is 260px wide rather than 160px. Here's what we need to change.
Remember that the left column position is definited by its margin from the right column. However, the controlling element is the left-hand side of the left column. That's not moving. Neither is the right column. So we can leave this part alone:
.threecolumns #left {
 margin:0 0 0 -660px;
 }
We do need to change the width of the left column. This is fairly simple: we just change 160px to 260px:
#left {
 float:left;
 font-size:1.2em;
 overflow:hidden;
 width:260px;
 }
We're going to take that extra 100px from the center of the site so let's decrease its width from 480px to 380px:
.threecolumns #center {
 margin:0 10px 0 270px;
 width:380px;
 }
Finally, we can leave the right column alone:
#right
 {
 float:left;
 font-size:1.2em;
 overflow:hidden;
 width:300px;
 }
Default Left Column Layout
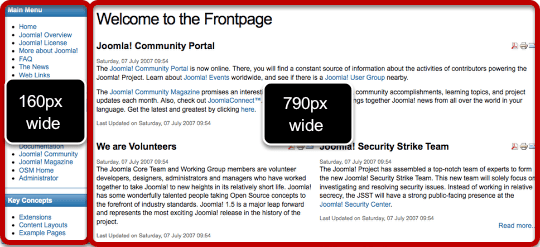
Whereas the three column layout can be tricky, the two column layouts are much more staightforward. We're just using simple widths for the two columns:
#left
 {
 float:left;
 font-size:1.2em;
 overflow:hidden;
 width:160px;
 }
.leftcolumn #center {
margin:0 0 0 170px;
width:790px;
}Changing the Left Column Width
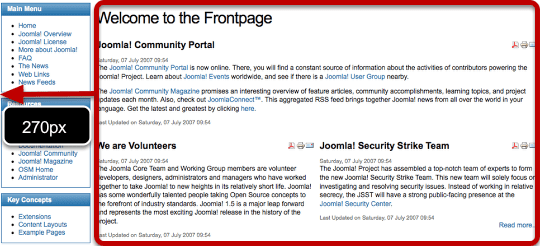
We're going to increase the size of the left column by 100px so let's increase the width from 160px to 260px:
#left
 {
 float:left;
 font-size:1.2em;
 overflow:hidden;
 width:260px;
 }
For the center column we need to reduce the width from 790px to 690px in order to add that width to the left column. We also need to accomodate the left column by increasing the margin from 170px to 270px:
.leftcolumn #center {
 margin:0 0 0 270px;
 width:690px;
 }
Default Right Column Layout
Again, the two column layout is staightforward. We're just using simple widths for the two columns:
.rightcolumn #center
 {
 margin:0 10px 0 0;
 width:650px;
 }
#right
{
float:left;
font-size:1.2em;
overflow:hidden;
width:300px;
}Changing the Right Column Width
We're going to make the right column narrower by 100px. So in order to fill up that space, let's make the center column wider by 100px:
.rightcolumn #center
 {
 margin:0 10px 0 0;
 width:750px;
 }
Now let's remove 100px from the right column.
#right
 {
 float:left;
 font-size:1.2em;
 overflow:hidden;
 width:200px;
 }
User Meta Plugin Extends Joomla's User Fields
- Written by Steve Burge Steve Burge
- Published: 17 September 2010 17 September 2010
User Meta is a small plugin that allows you to collect extra information from your users.
Most solutions to this problem require you to install a large and complex extension. Although User Meta does require a little coding it is a small and lightweight solution. Here's how you use it.
Download User Meta

Go to Joomlacode.org and download the User Meta plugin.
Upload User Meta
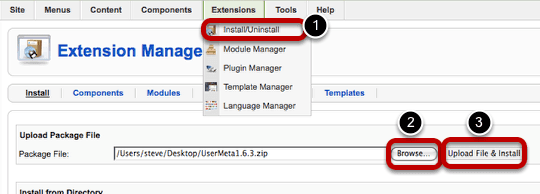
In your Joomla site, go to Extensions >> Install/Uninstall and upload the User Meta plugin. Then go to Extensions >> Plugin Manager and enable the plugin.
Setting Up the User Fields
Next, we'll go and set up our extra user fields. Open your file manager and browse to /plugins/system/usermeta/. Open the user.xml file.
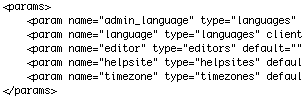
What you'll see are the current parameters that users see. These are "Back-end Language", "Front-end Language", "WYSYWYG Editor for this User", "Help Site for this User" and "Time Zone for this User":
Add Your Own Fields
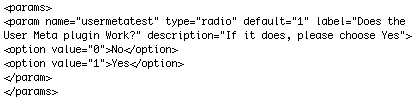
You can create your own parameters in here using Joomla's default system. It's the same plugin language used for all templates and extensions. I've chosen to use a radio button for this example, hence type="radio".
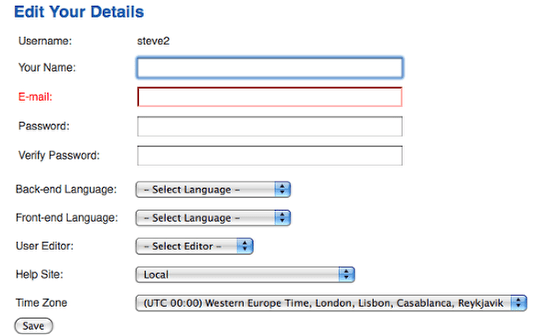
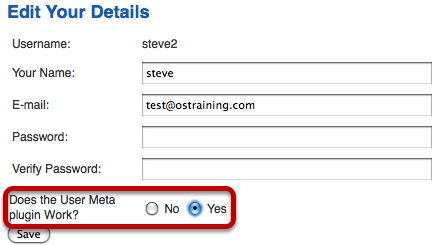
If you have any predefined choices you can save them using options as in the example above. When you save your user.xml file, go and login to the front of your site and visit the normal Joomla user account page. It should look like the image below:
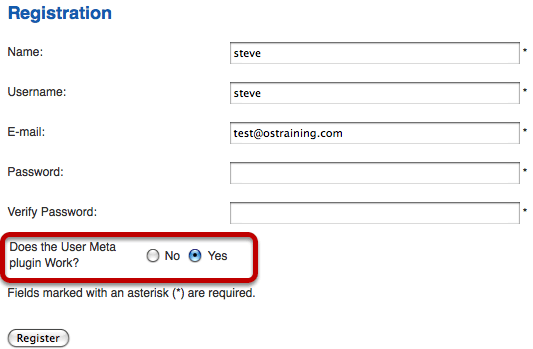
Adding the Fields to Your Site's Registration
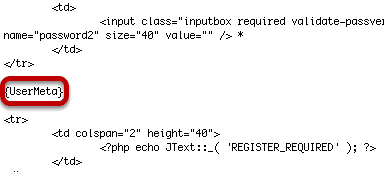
You can also add these fields to any Joomla layout page. However, it makes sense to add it to the registration form so you can collect this information when people join. All you need to do is insert: {UserMeta}. In order to use it in the registration form, I've edited /components/com_user/views/register/tmpl/default.php. The result is shown below:
Remember Not to Hack Core Files
If you do use this last technique for your site's registration, rather than hack the core registration file, it's best to just override it. Copy the file from /components/com_user/views/register/tmpl/default.php to /templates/your-template-name/html/com_user/register/default.php
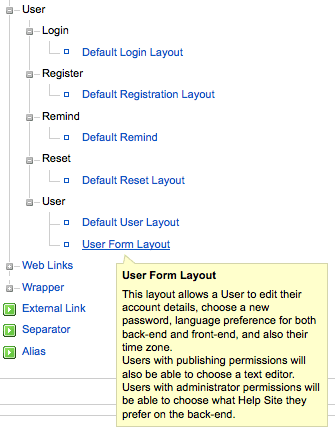
Joomla's User Menu Links
- Written by Steve Burge Steve Burge
- Published: 10 September 2010 10 September 2010
One of our Joomla students was wondering what options they could set up for their site's users.
Joomla comes with eight different menu links for users to interact with. 6 of them allow users to control their account by logging in, registering or editing their account. The other 2 links allow people to submit information.
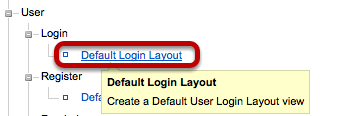
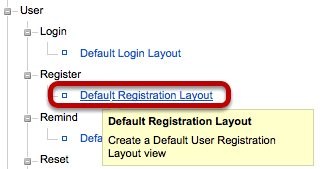
Here are the 8 links with the administrator view first (Menus >> Main Menu >> New) and then the front-end view that your users will see.
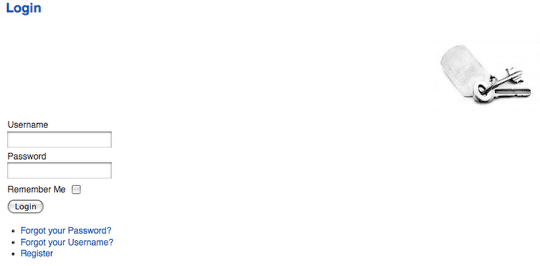
Default Login Layout - Allow People to Login to Your Site
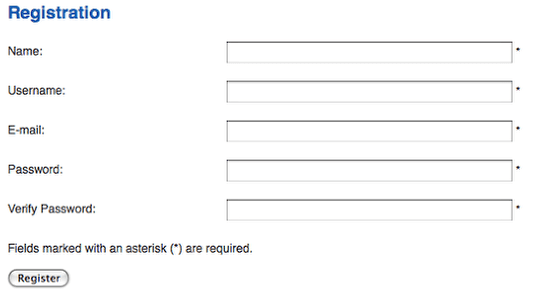
Default Registration Layout - Allow People to Register on Your Site
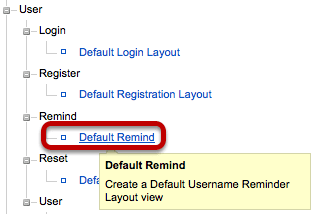
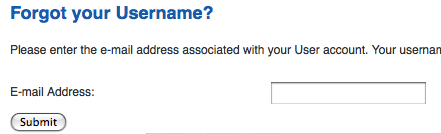
Default Remind - Recover Your Forgotten Username
If you've forgotten your username for your account, Joomla will send a reminder to your email address.
- If you've forgotten your email also ... you'll have to ask the site administrator.
- If you are the site administrator and you've forgotten your username and email (!), try this tutorial.
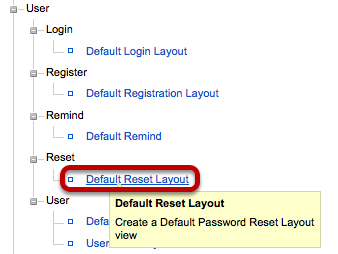
Default Reset Layout - Reset Your Lost Password
Many people will use the same password on many sites (it's not a good idea, but people do it anyway). So for security reasons Joomla will create a new password for you rather than send out the old one. First, you'll have to enter a token that Joomla send to your email address.

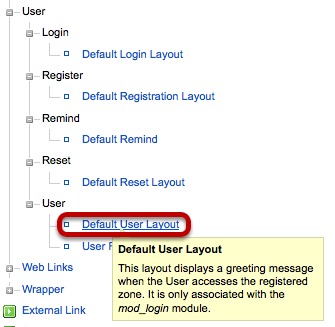
Default User Layout - Just a Simple Welcome Message
To be honest, this is not much use. Sorry.
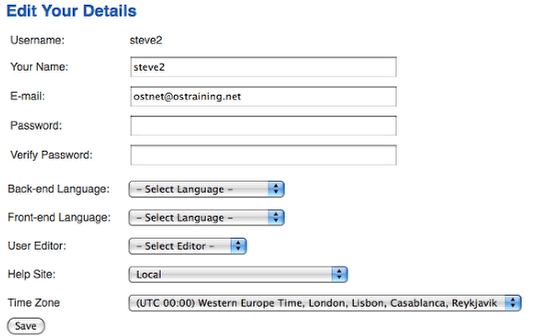
User Form Layout - Allow Users to Edit Their Account
If you'd like to turn off the bottom 5 dropdown boxes from Back-end language down to Time Zone, you can do that by going to Site >> Global Configuration >> System >> Front-end User Parameters >> set that option to "No".
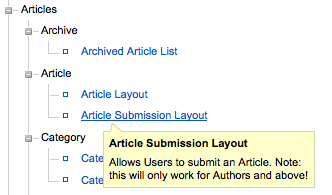
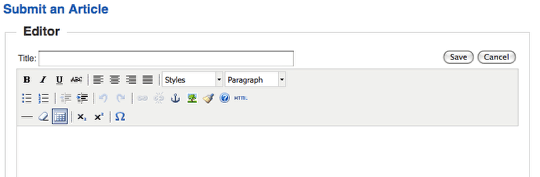
Article Submission Layout - Allow Users to Send in Articles
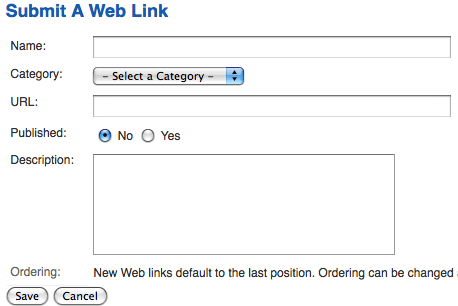
Web Link Submission Layout - Allow Users to Send in Weblinks