The Joomlashack Blog
New Christmas Shopping Revelation.
- Written by Joomlashack Joomlashack
- Published: 03 December 2010 03 December 2010
A funny short blog from last year. - Eddie.
Merry Christmas to all.

Newsflash: Independent investigations have revealed what everyone really wants this Christmas, and it's not an iPad, again. It's a Joomla Template. “It’s the perfect gift - - it’s even better than a Snuggie” one man said. A Joomla template is always the perfect size, it’s the right color, it will fit in any stocking, there’s no express-overnight shipping charges, and a Joomla template can be bought in your PJ’s at home without having to bathe, dress, and drive yourself in the snow to a congested mall. Indeed, a Joomla Template and specifically a Joomlashack Joomla Template is the perfect gift for all your loved ones this Christmas.
This blog started out as a quick joke meant to lighten up your day, but then I asked my kids aged 11 and 9 how they would feel if Christmas morning they got a template for a present? I half expected to get the same eye rolling I get when I threaten to bring them coal if they don’t behave. I totally did not expect the response I got: “A website template? As in… our very own websites? You mean… we could get our very own websites and fill them with whatever we like?” I am not sure if the prospect of a motorbike or a pony could have obtained the same excitement. They have already started making lists of all the toys, music, movie, and book reviews they will include as well as pictures of all their wonderful creations like drawings, paintings, comic strips, and Lego spaceships.
Am I on to something here?
Getting started with JForm in Joomla
- Written by James Karakaua James Karakaua
- Published: 29 November 2010 29 November 2010
JForm is one of the most exciting new features to be introduced as part of Joomla! 1.6. The intention is to provide XML configurable forms complete with custom field types and form validation. I cannot stress enough just how much easier this is going to make life as a Joomla! developer. In this article we take a look at how to define JForms and how to display them.
JomCDN Tutorial - Your Joomla Site on Amazon's CDN
- Written by Steve Burge Steve Burge
- Published: 21 November 2010 21 November 2010
This tutorial will show you how to host your website on a CDN (content delivery network).
A CDN solves the problem of hosting your website in only one part of the world:
- If your server is in the U.S.A., it's going to load much more slowly for visitors from Australia
- If your server is in Germany, your visitors from India are going to be waiting a long time.
CDNs solve that problem by hosting your content on multiple servers around the world. The client accesses the copy of the data that is nearest to them instead of pulling it directly from your central server. This speeds up load time and eliminates bottlenecks!
jomCDN is a Joomla extension that automatically collects your site's assets (images, Javascript files, CSS files, etc.), synchronizes them with Amazon's servers and relinks all your page content to the Amazon servers. Once it's set up, each person gets your sites file from the Amazon server nearest to them. Wherever your site visitors are in the world, they'll be happy.
Here's how to use jomCDN:
Read more: JomCDN Tutorial - Your Joomla Site on Amazon's CDN
Introducing ONYX: Our Latest Dark Template!
- Written by JohnFlanagan JohnFlanagan
- Published: 20 November 2010 20 November 2010
 Just in time for our BIG 25% OFF Sale, we bring you our latest Dark template, ONYX.
Onyx comes with a bundle of extras such as a super-slick featured slider module, eye-popping typography, and several module styles to help you add beautiful accents to your content.
Joomlashack Makes "15 Market Leaders of Premium WordPress, Joomla and Drupal Themes" List!
- Written by JohnFlanagan JohnFlanagan
- Published: 10 November 2010 10 November 2010
 We're thrilled to have been selected as one of the "15 Market Leaders of Premium WordPress, Joomla and Drupal Themes" by Speckyboy Design Magazine this week. There are dozens and dozens of template & theme providers out there for Wordpress, Drupal & Joomla, so to be singled out as one of the leaders in this space by an influential design mag/blog such as Speckyboy, is a great honor.
Here's what they said:
"Below is a list of 15 players in the theming industry that I personally can vouch for as they offer unique products and services. Basically there are three types of businesses that offer ready made CMS themes. Either you buy single themes on markets or from shops, or you can join a theme club and get full access to all designs on offer. Then if you need some grade of customization you will contact a web studio or a freelance developer to get your design tailored to your needs...."
Introducing RESERVA: An Empowering new Joomla Template
- Written by JohnFlanagan JohnFlanagan
- Published: 10 November 2010 10 November 2010

This week, we're excited to announce the release of our latest Joomlashack template called Reserva!
Reserva was designed for small businesses and individuals who not only want a stylish & sophisticated looking website, but want to give their visitors the ability to reserve rooms (hotels, motels, etc), reserve rental properties, book consulting time (financial planners, consultants, etc), book live performances (bands, comedians, etc)--or even make salon appointments directly from their website!
Imagine how Reserva could make your website work for you.
Reserva emPOWERs businesses...here's how:
Read more: Introducing RESERVA: An Empowering new Joomla Template
How to Disable a Joomla Plugin
- Written by Steve Burge Steve Burge
- Published: 08 November 2010 08 November 2010
This tutorial is out-of-date
This is a more up-to-date version of this tutorial
Sometimes it's necessary to disable or unpublish a Joomla plugin.
99.9% of the time plugins are completely harmless but 0.01% they can cause problems with your site and need to be turned off. Here are the three ways you can do that.
The first technique is the normal way to disable a plugin. The second and third techniques should only be used if the plugin has locked you out of Joomla's administrator area.
K2mart - Integrating K2 and Virtuemart
- Written by Steve Burge Steve Burge
- Published: 04 November 2010 04 November 2010
 K2mart is a new product from Joomlaworks, the people who created K2, the wonderful content component for Joomla (read Part 1 and Part 2 of our introduction to K2).
What is the purpose of K2mart? It allows you to import your Virtuemart products into K2. Why is this a good thing?
- You can really improve your product listings by adding image galleries, videos, tags, social bookmarks, comments and many of the other wonderful features of K2.
- You can create much more sophisticated designs for your product pages - K2 is very easy to design for whereas Virtuemart is notoriously difficult.
K2mart does replace all the design and layout features of Virtuemart but it doesn't replace the checkout process. Customers will still pay through Virtuemart,
Here's how to use K2mart:
Mobile Joomla Tutorial
- Written by Steve Burge Steve Burge
- Published: 29 October 2010 29 October 2010
There are several ways to make sure that your Joomla site is easy to read and browser on mobile phones. Recently we wrote The Ultimate Mobile Joomla Guide which covered 5 options in detail. In this tutorial we're going to explain more about Mobile Joomla which is one of the fastest and easiest ways to make your site mobile. It is particularly useful if you already have a site template and don't want to redesign everything just to get ready for mobile phone.
First-ever Landing Page template for Joomla, "Impacto", now available!
- Written by JohnFlanagan JohnFlanagan
- Published: 28 October 2010 28 October 2010
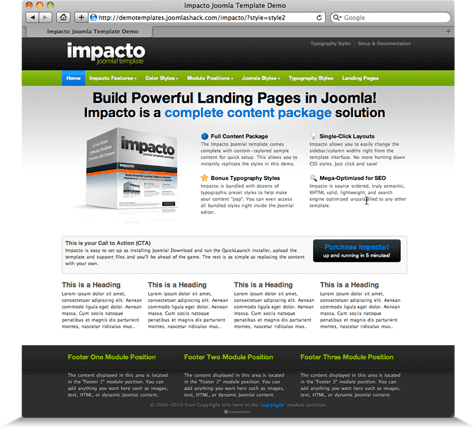 We've just released a brand new template at Joomlashack.com called Impacto, and besides being a great all-purpose Joomla template perfect for any site, it's also the first-ever Joomla template designed to be a powerful Landing Page for your advertising campaigns!
You probably already know just how important an effective Landing Page is in today's ultra competitive, e-commerce-driven world. The right Landing page layout can increase your Adwords sales and keep visitors on your site longer. And that's why Impacto is so..impactful. Impacto enables you to build stunning landing pages right inside Joomla! using bold, rich typography, preset styles, and customizable layout options that present your message clearly and effectively.
Read more: First-ever Landing Page template for Joomla, "Impacto", now available!