The hottest new extension in Joomla is K2.
Why? Normal Joomla articles provide you with a Title and Body. K2 gives you the flexibility to add much more information. Last week in Part 1 we covered the main administrator parts of K2:
- Installing K2
- The K2 dashboard
- K2 categories
- K2 fields and field groups
- K2 items
If you haven't done so already, I highly recommend that you go back and read Part 1 first. This week we're going to focus on the frontend of K2.
K2 Frontend
After Part 1, we should have a several categories, fields and items already inside K2. There are two items that we haven't covered yet, and they really affect the frontend of the site: users and tags.
K2 Users
Each user can have their own profile through K2. That information will appear at the bottom of each article they write, together with details of the other articles they've written. This is Chris, the author of the Canon EOS Rebel article:

- Administrators: People who are Managers, Administrator or Super Administrators can upload their information by going to Components >> K2 >> Users
- Front-end users: When you uploaded the original K2 package, it included a module called "K2 Login". Go to Extensions >> Module Manager and publish that module to allow front-end users to manage their profile.
One downside is that you can't create user fields currently, without writing a custom plugin. There is only:
- Name
- Gender
- Avatar
- Website
- Description
That stands in contrast to a really powerful feature of K2's user system:
K2 User Groups
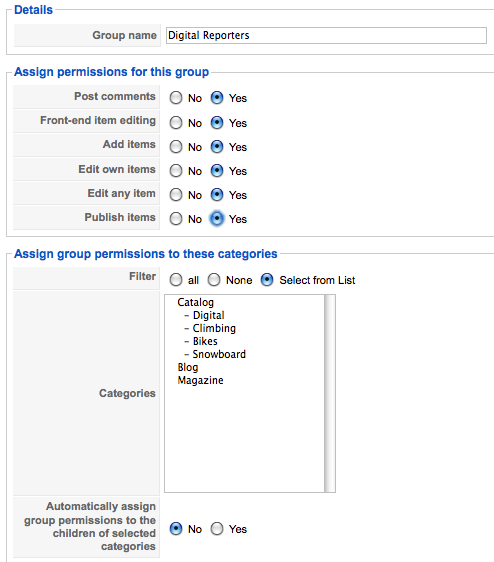
K2 allows you to have different authors for different categories of your site. If you'd like to have a "Digital Reporter" who submits only review of cameras, you can go to Components >> K2 >> User Groups >> New and create that group from the screen below:

So you could create several different levels of users. To give just three simple examples:
- Contributors: They can add items in particular categories.
- Copy Editors: They can edit and publish items in particular categories.
- Senior Editors: They can add, edit, publish and control items in all categories.
If you use the "K2 Login" module, people can submit articles from the front-end without needing to write from the admin.
K2 Tags
K2 also has the option to add keyword tags to items. These are common in blogs and also is in catalogs so people can easily find related products. On your items, it will look like this:

These tags can be added easily: when you're submitting an item:

K2 Menu Links
Let's start seeing how our items look. Go to Menus >> Main Menu >> New and click K2. You'll see a screen like this:

- Item: Link to just one single K2 item.
- Categories: Link to items form one or more categories at the same time.
- Tag: You can add keywords to the bottom of each item.
- User Page (blog): You can have a list of all the items written by one author
- Latest items: This one explains itself :)
We've been looking at https://demo.getk2.org as an example. If you look there you'll see examples of those different kinds of layouts:

- "Product" = Item
- "Blog Entry" = Item
- "Category Layout"and "Product Categories" = Categories
- "Latest items" = Latest Items
An Overview of K2 - the Missing Documentation (Part 2)
Hopefully we've given you a taster of K2 and how you can use it to create articles with far more information and features.
We've taken you through all the basic aspects of K2. There's enough material for many more tutorials, including how to add video, photos, photo galleries, attachments and much more, but hopefully these two tutorials have been enough for you to catch the K2 bug!
