
We have covered Joomla template overrides in this blog and in our Joomlashack University video class.
In this tutorial, you will learn how to combine template overrides and the core Template component.
I'm going to show you how to create a custom layout that you can use for individual Joomla articles.
Step #1. Create a template override
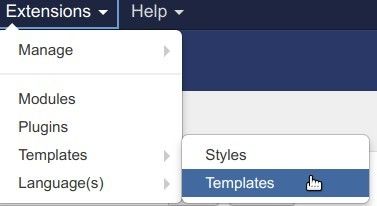
- Go to Extensions > Templates > Templates:
- Scroll down and click on [Your template name] - Details and Files. For this example, we are using the Breeze template, but this will work for your template too.
- Now click through to find the article layout files:
- Create overrides
- Components
- com_content
- article
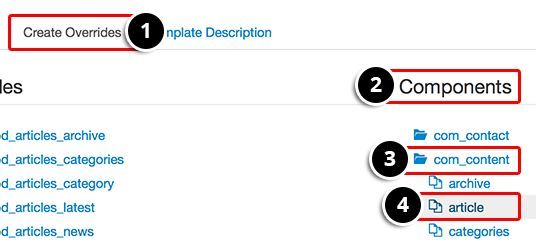
After you click on the article layout files, Joomla will automatically create a copy of the files that you can use as overrides.
The new files will be located at /templates/yourtemplate/html/com_content/article/. You can see those new files below:
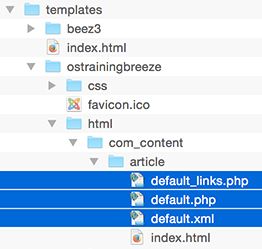
Inside that folder, we have two more steps to take:
- Delete the default.xml file.
- Rename the two PHP files to breeze.php and breeze_links.php.
The Template core component is a wonderfully easy tool to create override files, but it does have limitations. For example, it doesn't work well when your current template already has a template override for single articles. In that situation, it's necessary to manually copy the files:
- Copy default.php and default_links.php from /components/com_content/views/article/tmpl/.
- Paste those files with new names: breeze.php and breeze_links.php respectively into /templates/yourtemplate/html/com_content/article/.
Step #2. Customize the new layout
- Open the breeze.php file in a code editor like Notepad++.
In this example, we will use columns to display the image on the left and the full text on the right.
- Change the code you can find between the lines 173 to 187:
<div class="pull-<?php echo htmlspecialchars($imgfloat); ?> item-image"> <img
<?php if ($images->image_fulltext_caption):
 echo 'class="caption"'.' title="' .htmlspecialchars($images->image_fulltext_caption) . '"';
endif; ?> src="/<?php echo htmlspecialchars($images->image_fulltext); ?>" alt="<?php echo htmlspecialchars($images->image_fulltext_alt); ?>"/> </div>
<?php endif; ?>
<?php
if (!empty($this->item->pagination) && $this->item->pagination && !$this->item->paginationposition && !$this->item->paginationrelative):
 echo $this->item->pagination;
endif;
?>
<?php if (isset ($this->item->toc)) :
 echo $this->item->toc;
endif; ?>
<?php echo $this->item->text; ?>
We're going to wrap the image and fulltext into two columns by using the bootstrap classes row-fluid and span6.
This is how the code should look after that update:
<div class="row-fluid">
 <div class="span6">
 <div class="pull-<?php echo htmlspecialchars($imgfloat); ?> item-image"> <img
<?php if ($images->image_fulltext_caption):
 echo 'class="caption"'.' title="' .htmlspecialchars($images->image_fulltext_caption) . '"';
endif; ?> src="/<?php echo htmlspecialchars($images->image_fulltext); ?>" alt="<?php echo htmlspecialchars($images->image_fulltext_alt); ?>"/> </div>
 </div>
 <div class="span6">
 <?php echo $this->item->text; ?>
 </div>
</div>
<?php endif; ?>
<?php
if (!empty($this->item->pagination) && $this->item->pagination && !$this->item->paginationposition && !$this->item->paginationrelative):
 echo $this->item->pagination;
endif;
?>
<?php if (isset ($this->item->toc)) :
 echo $this->item->toc;
endif; ?>
Step #3. Enable the new layout
This layout will work when you choose it in the article settings.
- Go to Content > Articles > Your article.
- Go to Options tab > Alternative layout > breeze.

- Click Save & Close.
- Open your article in the frontend to see your new layout:

Additional Reading
What's Next?
What's Next?
Save $1,000's when you sign up for Joomlashack's Everything Club.
You will get your hands on our extensive range of over 20 extensions, plus legendary support!