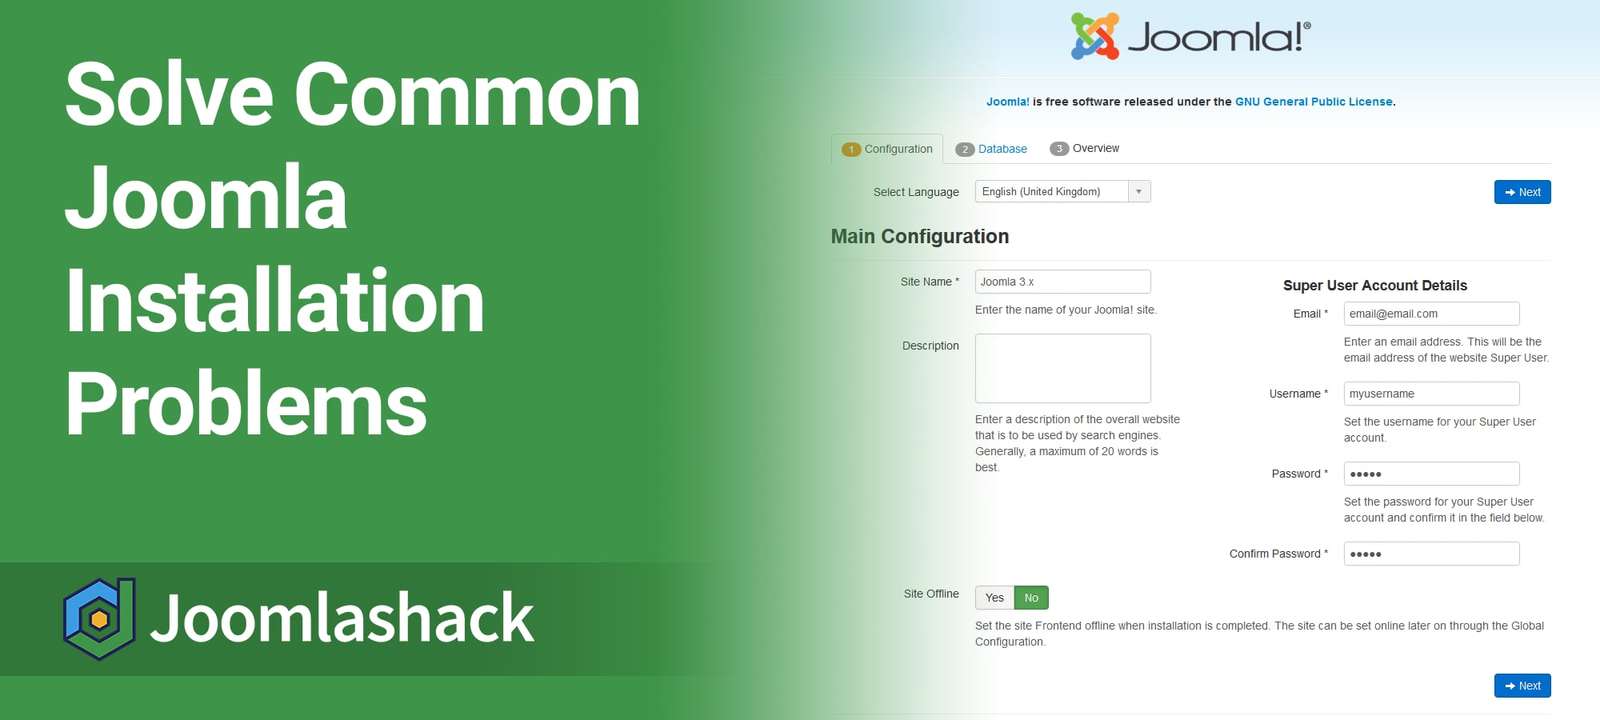
Our customers often ask us about Joomla installation problems. As you're going through a Joomla installation process, there are several possible issues that you might encounter.
In this tutorial we aim to help you solve as many of those issues as possible.
Recommended Settings
One of the first things you see on installing Joomla is the Recommended settings screen. Red letters in the Actual column are often a cause for concern.
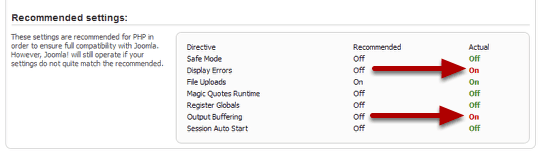
Many times you can ignore them and things will still work out fine, but if you want to change them, keep reading this guide. We will cover the most common questions.
First of all, let's show you how to find the php.ini file which is what you'll need to fix many of these issues ...
Where is the php.ini file?
The php.ini file may be found in different places on different servers. This isn't a comprehensive list but it should cover many of you and provide the rest of you with good clues on where to look.
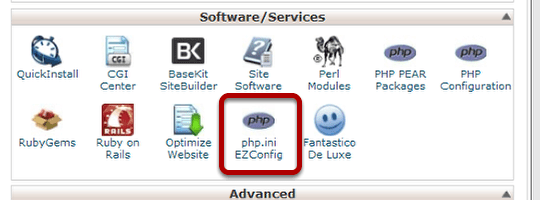
- cPanel Shared Servers: php.ini is sometimes located in the Joomla root directory. cPanel may have a special wizard for you in the Software services section.
- Parallels Plesk Panel: /etc/php.ini
- XAMPP: C:\xampp\php\php.ini
- Ubuntu: /etc/php5/apache2
- GoDaddy servers: You need to create your own and place it in the Joomla root directory
It's important to note that if you are running PHP 4, you should name your initialization file php.ini. If you are running PHP 5, name your initialization file php5.ini.
Display Errors
This is not a flaw and can generally be ignored during installation. But you have the option.
Method #1: You can turn Display Errors to "off" after installation in your Global Configuration settings. If there is some reason this is a problem, here are some possible solutions. Use the simplest method that works. You don't have to use all of them.
Method #2: Modify the php.ini file. Open the file in an editor and locate:
display_errors = On or display_errors = 1Change this value to:
display_errors = Off or display_errors=0.Method #3: Modify the .htaccess file. If you wish to turn off the display_errors setting and do not have access to the php.ini file you can try adding this line to the .htaccess file which in your main Joomla folder. Enter this:
php_flag display_errors "0"Sometimes you may need to change the "0" to "Off".

Strict Standards
This is usually more of a problem when installing on localhost on your own computer. The error reporting is set to strict, so it displays an entire screen of warnings. Note these are warnings not error messages. You don't need to fix them, you just need to change the rules. The error message reads:
Strict Standards: Accessing static property JCache::$_handler as non staticIn the php.ini file, locate the line that starts:
error_reporting =Change the value t:
error_reporting = E_ALL & ~E_NOTICE & ~E_DEPRECATEDAlso locate:
display_errors = OnChange the value to:
display_errors = OffStop then restart Apache for the new settings to take effect. How you stop and restart Apache will depend on which local server package you are running. (XAMPP, WAMP, etc.) Commercial servers usually have a Services package that will let you stop and start services.

Output Buffering
In the php.ini file you will find a description of output buffering which reads "Output buffering is a mechanism for controlling how much output data (excluding headers and cookies) PHP should keep internally before pushing that data to the client.
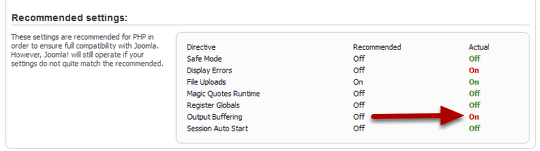
If your application's output exceeds this setting, PHP will send that data in chunks of roughly the size you specify." In plain English, Output Buffering helps your site to run more quickly.
Open your php.ini file and search for output_buffering, and change the value. You have three possible values.
- On = Enabled and buffer is unlimited
- Off = Disabled
- Integer = Enables the buffer and sets its maximum size in bytes. ; Recommended settings - Development Value: 4096; Production Value: 4096.
Change it to this:
output_buffering = 4096
or this:
output_buffering = Off
Change register_globals from On to Off
register_globals is a potenial security hole for you site and it is definitely worth turning it off. To turn off register_globals, look for this line in the php.ini file:
register_globals = On
and change it to:
register_globals = Off

Increase the PHP upload limit
Often if you have a problem installing plugins or uploading pictures, the most common cause is a low limit on the size of files that you can upload.


Open the php.ini file and look for these variables:
post_max_size = 8MThis variable determines the maximum amount of data that PHP will accept in a single form submission using the POST method. Its default value is 8 MB,
upload_max_filesize = 2MThis variable limits the size of an individual file uploaded. Its default value is 2 MB. To change the limit, edit or add the following values in your php.ini file. The maximum upload value that you can specify for upload_max_size and post_max_size is 192M.
memory_limit = 50M
post_max_size = 10M
You can also make sure you have permissions needed to upload files.
file_uploads = On
upload_max_filesize = 10M
If you are still having problems, check to see that you have a /tmp/ directory and that it has writable permissions (usually 755).
cURL not loaded

While trying to upgrade a 1.5 site on my XAMPP installation I got the following error message.
Notice: Undefined property: stdClass::$timelimit in ..... \includes\jupgrade.class.php on line 156 406: cURL not loaded
There are a few other things that may generate this. The simple answer is to load cURL.
- Go to your php.ini file. (In my case it was located on my local computer at C:\xampp\php\php.ini)
- Find the he phrase ;extension=php_curl.dll;
- Delete the semicolon that precedes it.
- It will now read extension=php_curl.dll; (The semicolon "comments it out")
- Save the file;
- in XAMPP control-panel; Click on Stop next to Apache; then click on Start again.
This will not probably be a problem on a commercial server, but if it is and you make the change to your php.ini file you may have to ask them to restart Apache if you can't.
What's Next?
What's Next?
Save $1,000's when you sign up for Joomlashack's Everything Club.
You will get your hands on our extensive range of over 20 extensions, plus legendary support!